
Secure front wheel in position.
Remove the seat.
Remove exhaust manifold. See Group 18.
Remove the fuse box.
Remove brake fluid reservoir from rear frame.
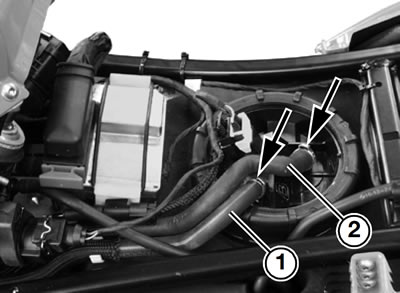
Close off fuel supply line (1) and the fuel return line (2) with hose clips, BMW No. 13 3 010.
Open the hose clips (arrows) and disconnect the fuel lines from the fuel-pump unit.
Release fuel hoses from clips on control-unit holder.

Note: Do not unplug the BMS control unit.
Disengage the rubber strap (arrow) and remove the BMS control unit (6).
Disconnect the plugs for fuel-level sensor (3) and fuel pump (4).
Disconnect the plug for rear light/turn indicator (5).

Unclip ABS sensor plug (arrow) from the controlunit holder.
[US] Disconnect hose from fuel evaporation control valve (7).
Remove lower fasteners securing rear frame to main frame.
Remove upper fasteners securing the rear frame to the main frame and carefully remove the rear frame complete with the tank.
Installation is the reverse of the removal procedure: pay particular attention to the following
When installing the rear frame, make sure that all lines and hoses are routed at the top of the tank.
Note: When lowering the rear frame, make sure that the brake line is routed between the front section of the mudguard and the rear frame.
Clean the threads of the frame and the securing screws for the rear frame, coat threads with Loctite 2701 and install the screws.
Make sure that fuel feed hose (1) and fuel return hose (2) are correctly routed.
Warning! Do not use screw-type hose clamps on the fuel hoses, because they could damage the hoses and result in a fire hazard.
Close hose clamps with pliers, BMW No. 13 1 500.
Tightening torques:
- Oxygen sensor to exhaust: 45 Nm
- Exhaust manifold to cylinder head: 20 Nm
- Clamp for silencer: 55 Nm
- Engine guard to frame: 9 Nm
- Brake fluid reservoir for rear brake to rear frame: 5 Nm
- Rear frame to main frame, top: 21 Nm
- Rear frame to main frame, bottom (clean threads + Loctite 2701): 21 Nm