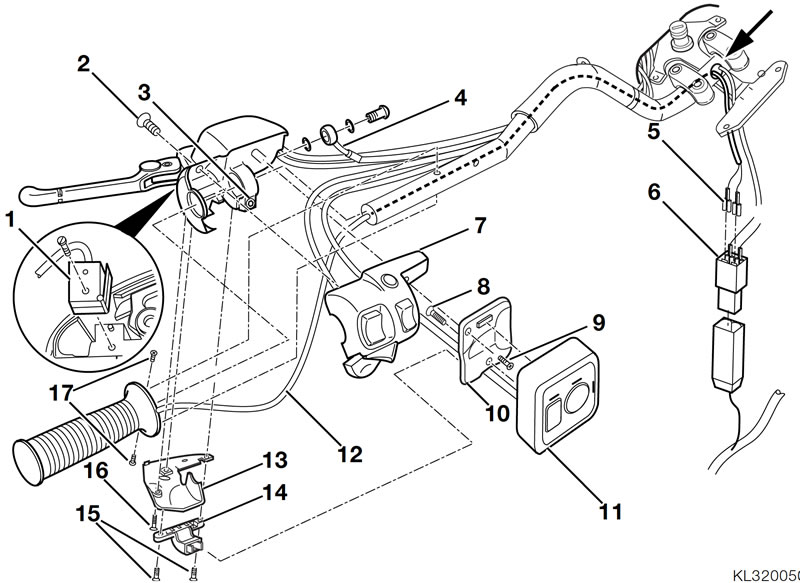
- Remove left and right fairing side sections.
- Remove tank cover.
- Remove handlebar trim.
- Remove cover of fork bridge.
Caution: Do not allow brake fluid to come into contact with painted parts of the motorcycle, because brake fluid attacks paint.
- Drain the clutch operating system.
- Disconnect clutch line (4) from clutch-lever fitting.
- [With heated grip]. Disconnect plug (6) for the heated grip.
- [With heated grip]. Pull cable shoe (5) for heated grip, left, out of connector.
- Remove fastener (8) and move radio control unit (11) clear.
- Remove screws (15) and remove holder (14).
- Remove screw (9) and remove radio control unit (11) with rear panel (10).
- Remove screw (16) and remove lower cover (13).
- Remove screw (2) and remove multi-function switch (7).
- Remove clutch switch (1).
- Remove fasteners (17) for grip.
- [With heated grip]. Pull grip complete with cable (12) off handlebar, feeding cable through bore (arrow) until clear.
- Pull grip off handlebar.
- Slacken clamping screw (3) for clutch-lever fitting.
- Pull clutch-lever fitting off handlebar.
- Installation is the reverse of the removal procedure: pay particular attention to the following.
- When assembling, press connector of clutch pressure line (4) against stop on clutch-lever fitting.
Caution: Make sure that all lines are correctly routed.
Tightening torques:
- Clutch lever fitting to handlebar — 5 Nm
- Pressure line to clutch-lever fitting — 18 Nm
