Water Temperature Sensor Removal/Installation
Caution: Never drop the sensor, especially on a hard surface. Such a shock to the sensor can damage it.
- Drain the coolant (See Coolant Change in the Periodic Maintenance chapter).
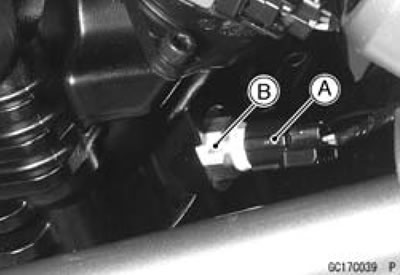
- Disconnect the sensor connector [A], and unscrew the water temperature sensor [B].
Torque - Water Temperature Sensor: 12 N·m (1.2 kgf·m, 106 in·lb)
- Apply grease to new O-ring on the water temperature sensor.
- Fill the engine with coolant and bleed the air from the cooling system (See Coolant Change in the Periodic Maintenance chapter).

Water Temperature Sensor Output Voltage Inspection
Note: Be sure the battery is fully charged. The output voltage changes according to the coolant temperature in the engine.
- Remove the ECU (See ECU Removal).
Do not disconnect the connectors.
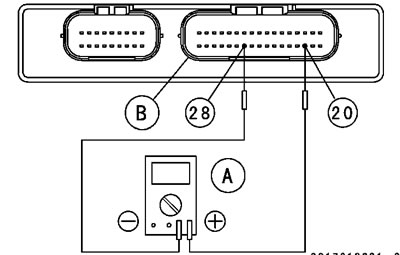
- Connect a digital meter [A] to the ECU connector [B] with the needle adapter set.
Special Tool - Needle Adapter Set: 57001-1457

Water Temperature Sensor Output Voltage Connections to ECU Connector
- Meter (+) → O lead (terminal 20)
- Meter (-) → BR/BK lead (terminal 28)
- Measure the output voltage with the engine stopped and the connector joined.
- Turn the ignition switch ON.
Output Voltage at ECU
Standard: About 2.80-2.97 V at 20°C (68°F)
- Turn the ignition switch OFF.
If the output voltage is within the standard, check the ECU for its ground, and power supply (See ECU Power Supply Inspection).
If the ground and power supply are good, replace the ECU (See ECU Removal/Installation).
If the output voltage is out of the standard, check the wiring.
If the wiring is good, check the water temperature sensor resistance (See Water Temperature Sensor Resistance Inspection).
Water Temperature Sensor Resistance Inspection
- Refer to the Water Temperature Sensor Inspection in the Electrical System chapter.
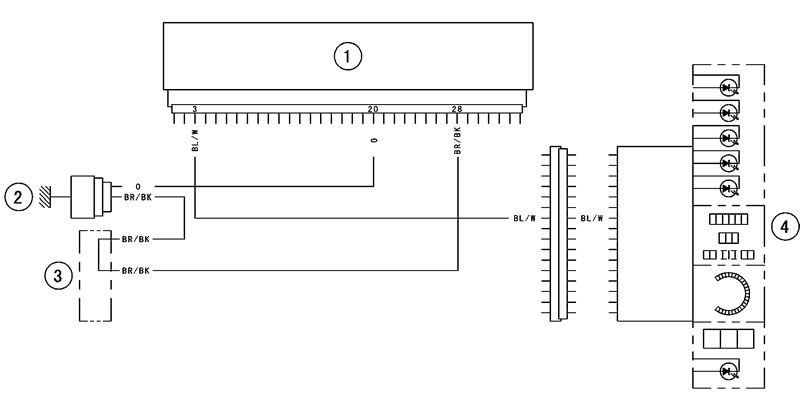
Water Temperature Sensor Circuit

1. ECU; 2. Water Temperature Sensor; 3. Water-proof Joint E; 4. Meter Unit
