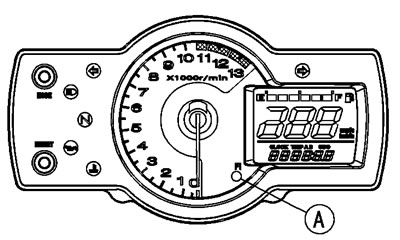
Note: Use a fully charged battery when conducting self-diagnosis. Otherwise, the light (LED) blinks very slowly or doesn't blink. Keep the self-diagnosis terminal grounded during self -diagnosis, with an auxiliary lead.

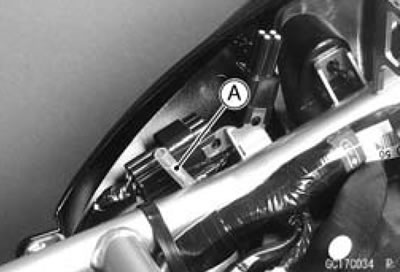
- Remove the seat (See Seat Removal in the Frame chapter).
- Ground the self-diagnosis terminal [A] (Orange/Black lead) to the battery (-) terminal or battery (-) lead connector, using a wire.

- Turn on the ignition switch.
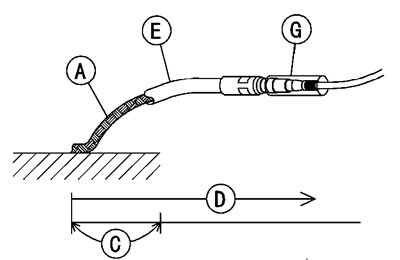
- Connect an auxiliary lead [E] to the self-diagnosis terminal [G] for grounding.
- To enter the self-diagnosis dealer mode 1, ground [A] the self-diagnosis indicator terminal to the battery (-) terminal for more than 2 seconds [C], and then keep it grounded continuously [D].
Count the blinks of the light (LED) to read the service code. Keep the auxiliary lead ground until you finish reading the service code.

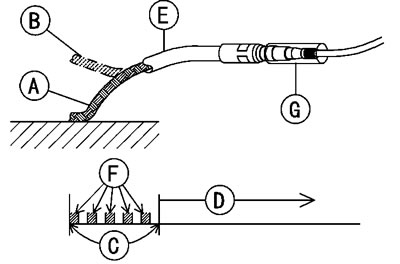
- To enter the self-diagnosis dealer mode 2, open [B] and ground [A] the lead more than five times [F] within 2 seconds [C] after the lead is first grounded, and then keep it grounded continuously [D] for more than 2 seconds.
Count the blinks of the light (LED) to read the service code. Keep the auxiliary lead ground until you finish reading the service code.
- Auxiliary Lead [E]
- Self-diagnosis Terminal [G]
Note: To enter the dealer mode 2 from the dealer mode 1, turn off the ignition switch once.

