Note: The primary and secondary throttle position sensors are different and must never be transposed. For ease of identification, the primary throttle positron sensor has a shorter connector cable than the secondary.
Removal
1. Remove the rider's seat.
2. Disconnect the battery, negative (black) lead first.
3. Remove the throttle bodies as described on page 11.122.
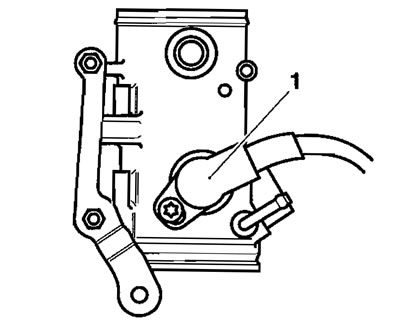
4. Remove the Torx screw securing the primary throttle position sensor to the throttle body.

1. Primary throttle position sensor
5. Turn the sensor anti-clockwise and detach it from the throttle body by gently pulling outwards.
Installation
1. Lubricate the sensor 'O'-ring with a smear of petroleum jelly.
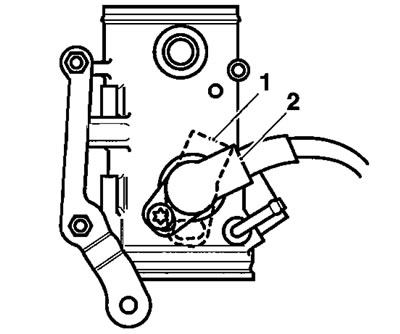
2. Insert the sensor to the throttle body at the angle shown below then turn it anti-clockwise until the screw hole aligns with the thread in the throttle body.

1. Sensor insertion position (dotted line); 2. Sensor initial fitted position (solid line)
3. Insert the Torx screw to secure the throttle potentiometer, but do not fully tighten the screw yet.
4. Refit the throttle bodies as described on page 11.123.
5. Temporarily reconnect the battery, positive (red) lead first.
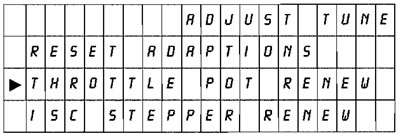
6. Connect the diagnostic tool and scroll through to, and select the 'ADJUST TUNE1 option.
7. At the next screen, align the cursor with THROTTLE POT RENEW (see below) then press the validation key which is marked:

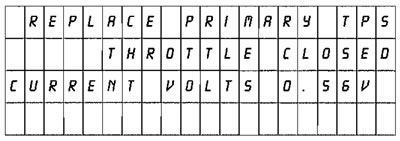
8. On pressing the validation key, the diagnostic tool will send a command, which drives the primary throttle to the fully closed position. The tool will also display the voltage reading coming from the throttle position sensor.

9. Gently rotate the new throttle position sensor until the voltage reading on the tool shows 0.6 volts +/- 0.02 volts.
Note: This is a setting voltage only. Because of the adaptive nature of the engine management system, in-service voltage may vary from this setting figure.
10. Tighten the sensor retaining screw to 3.5 Nm and recheck the voltage reading shown on the tool. Repeat the adjustment if the reading is outside the specified range.
11. Press the validation key marked to return the throttle to normal control and return the diagnostic tool to the ADJUST TUNE menu.
12. Disconnect the diagnostic tool.
13. Disconnect the battery negative (black) lead first.
14. Check that the throttle opens and closes without obstruction/sticking and has a smooth action throughout the full range of its movement. Rectify as necessary.
Warning! Operation of the motorcycle with an incorrectly adjusted throttle position sensor, or a throttle position sensor that causes the throttle to stick could result in loss of throttle control. Loss of throttle control could result in loss of control of the motorcycle and an accident.
Warning! Operation of the motorcycle with an incorrectly adjusted, incorrectly routed or damaged throttle cable could interfere with the operation of the brakes, clutch or the throttle itself. Any of these conditions could result in loss of control of the motorcycle and an accident.
Warning! Move the handlebars to left and right full lock while checking that cables and harnesses do not bind. A cable or harness that binds will restrict the steering and may cause loss of control and an accident.
15. Support the tank, remove and stow the tank prop, then lower the tank to the frame and secure it as described on page 11.99.
16. Refit the intake cover as described on page 11.99.
17. Reconnect the battery, positive (red) lead first.
18. Refit the rider's seat.
