
Note: The fuel tank may be raised without being removed completely, for access to the top of the engine, ignition coils, spark plugs etc.
Warning!
- Observe the warning advice given in the general information section on the safe handling of fuel and fuel containers.
- A fire, causing personal injury and damage to property could result from spilled fuel or fuel not handled or stored correctly.
Fuel tank - raising
1. Remove the rider's seat.
2. Disconnect the battery negative (black) lead first.
3. Release the two fixings securing the instrument pack to the handlebar clamp cover.

1. Instrument pack; 2. Handlebar clamp cover; 3. Fixings
4. Tilt the instruments forward.
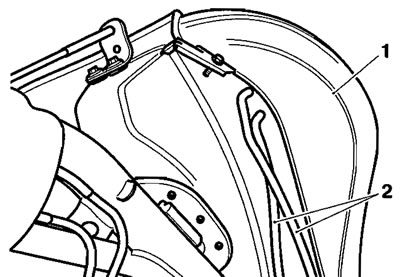
5. Remove the intake cover from the left hand side of the tank as follows, release the two screws from its front and rear edges and then slide it downwards to release it from two support studs in its centre.
1. Intake cover; 2. Intake cover screws
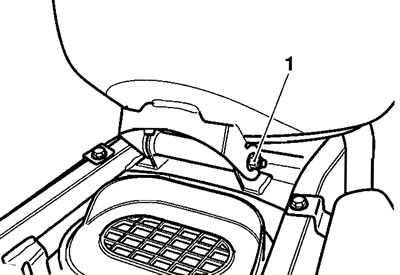
6. Release the single fixing from the front of the fuel tank.
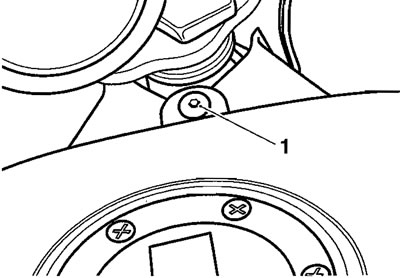
1. Fixing
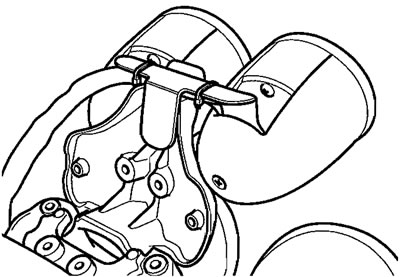
7. Pivot the fuel tank upwards at the front, support
the tank while detaching the tank prop from two clips on the outside of the coil bracket.
1. Coil bracket; 2. Fuel tank prop
8. Locate the plain end of the prop in the fuel tank fixing hole and the spherical end in the fixing bracket on the tank.
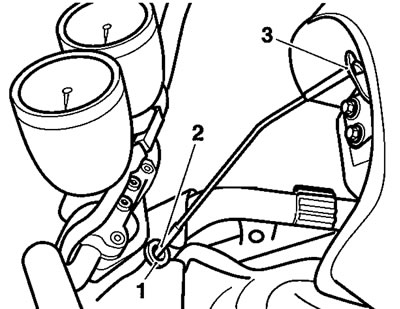
1. Fuel tank fixing hole; 2. Prop - plain end; 3. Prop- ball end
Fuel tank - lowering and securing
1. Support the tank and remove the tank prop.
2. Continue to support the tank while refitting the prop to the two clips on the outside side of the coil bracket.
1. Coil bracket; 2. Fuel tank prop
3. Lower the tank into position and secure with the forward fixing. Tighten the fixing to 9 Nm.
4. Refit the intake cover as follows; align the cover to the centre studs and ease it into place. Fit and tighten the two screws to 9 Nm.
5. Pivot the instruments into place. Fit the two screws and tighten to 3 Nm.
6. Reconnect the battery, positive (red) lead first.
7. Refit the rider's seat as described on page 17.9.
Fuel tank - removal
1, Raise and prop the tank as described on page 11.98.
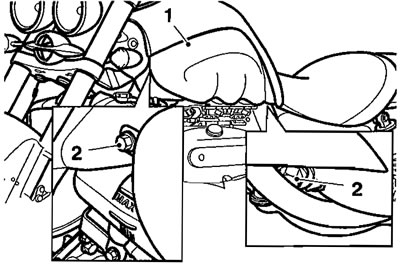
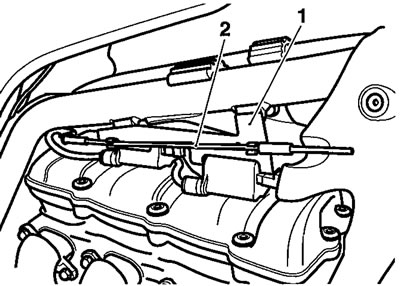
2. Make a note of, or mark the position of the two breather hoses at the front left side of the tank, before disconnecting both hoses.
1. Fuel tank; 2. Breather hoses
Warning! The fuel pipe will contain fuel under pressure. When releasing the fuel pipe union, wear eye protection and protective clothing and ensure that the pressurised fuel is not exposed to naked flames, light bulbs, etc. A fire, causing personal injury and damage to property, may result from fuel exposure to naked flames, light bulbs and any other source of ignition.
Note: The fuel supply system is fitted with a check valve to prevent fuel flow from the tank when the hose is disconnected. It is not necessary to plug the connection.
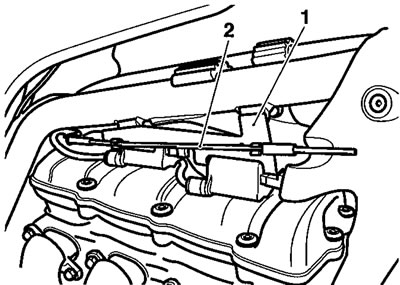
3. Disconnect the fuel pipe from the fuel pump plate in the base of the tank and discard the sealing washers. Drain the pipe contents into a suitable fuel container.
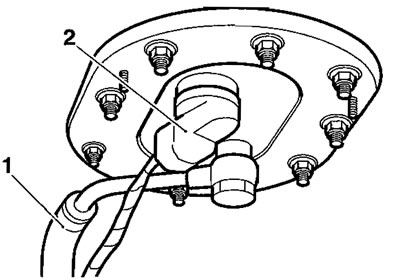
1. Fuel hose; 2. Electrical connection
4. Disconnect the electrical connection from the fuel pump plate.
5. Support the fuel tank while removing the rear mounting bolt.
1. Rear mounting bolt
6. Raise the tank from the frame and have a colleague collect the tank prop.
Note: Store the tank prop in a convenient place, ready for when the tank is refitted.
7. Place the fuel tank in a safe place.
Fuel tank - refit
1. Position the fuel tank to the frame and install the rear mounting bolt.
2. Pivot the front of the tank upwards at the front and refit the tank prop to the frame and tank
3. Tighten the rear fuel tank mounting bolt to 9 Nm.
4. Incorporating new washers, refit the fuel hose and tighten the union to 15 Nm.
5. Reconnect the electrical supply to the fuel pump plate.
6. Connect the breather hoses as noted/marked prior to removal.
7. Lower and secure the fuel tank as described on page 11.99.