
Warning!
- Never use mineral-based grease (such as lithium or copper based grease) in any area where contact with the braking system hydraulic seals and dust seals is possible. Mineral-based grease will damage the hydraulic seals and dust seals in the calipers and master cylinders.
- Damage caused by contact with mineral-based grease may reduce braking efficiency resulting in loss of motorcycle control and an accident.
Warning!
- Before installation, all internal brake components should be cleaned and lubricated with clean new DOT 4 brake fluid.
- Never use solvents, petrol (gasoline), engine oil, or any other petroleum distillate on internal brake components as this will cause deterioration of the hydraulic seals in the calipers and master cylinders.
- A dangerous riding condition leading to loss of motorcycle control and an accident could result if this warning is ignored.
1. Clean the master cylinder bore, piston and seals, with new brake fluid.
2. Ensure all ports are clear of obstruction.
Warning! Ensure that the piston and piston seal are fitted facing the same way as noted during removal. A dangerous riding condition leading to an accident could result from incorrect assembly of the master cylinder.
3. Install the spring and piston set together.
4. Apply a small amount of brake grease to the push rod.
5. Install the push rod in the master cylinder and retain with a new circlip.
6. Refit the boot.
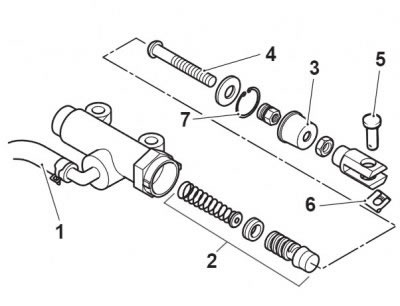
1. Reservoir hose; 2. Piston set; 3. Dust boot; 4. Push rod; 5. Clevis pin; 6. Clip; 7. Circlip
7. If the push rod has been disassembled, set the push rod free length to 75.5 mm, as shown below:

1. Push rod; 2. Lock nut
8. Tighten the lock nut to 18 Nm.