Prepare
1. Remove engine. See Replace engine.
2. Remove starter. See Removing and installing starter.
3. Remove clutch. See Removing and installing clutch.
4. Remove cylinder head covers. SeeCylinder head covers.
5. Remove cylinder heads. See Cylinder heads.
6. Remove cylinders. See Removing and installing cylinders.
7. Remove balancer shaft. See Removing and installing balancer.
8. Remove output pulley. See Output pulley.
9. Separate crankcase. See Crankcase assembly.
Remove
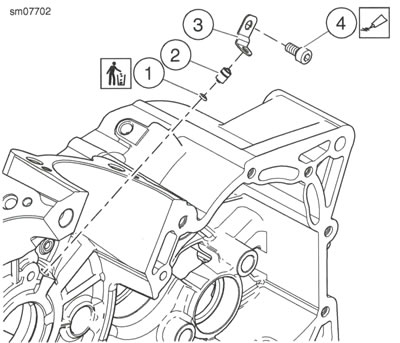
1. See Figure 4-50. Remove nozzle.
- a. Remove screw (4).
- b. Remove plate (3).
- c. Remove nozzle (2).
- d. Discard O-ring (1).
Install
| FASTENER | TORQUE VALUE | |
| Oil nozzle screw | 10.0-12.0 Nm | 89-106 in·lbs |
Warning: Compressed air can pierce the skin and flying debris from compressed air could cause serious eye injury. Wear safety glasses when working with compressed air. Never use your hand to check for air leaks or to determine air flow rates.
Note: Clean nozzles with low-pressure compressed air as needed.
1. See Figure 4-50. Install nozzle.
- a. Install new O-ring (1).
- b. Install nozzle (2).
- c. Install plate (3).
- d. Apply LOCTITE 246 MEDIUM STRENGTH THREADLOCKER AND SEALANT (blue) to screw (4).
- e. Install screw (4). Tighten to 10.0-12.0 Nm (89-106 in·lbs).

Figure 4-50. Oil Nozzles: 1. O-ring; 2. Nozzle; 3. Plate; 4. Screw
Complete
1. Join crankcase halves. See Crankcase assembly.
2. Install output pulley. See Output pulley.
3. Install balancer shaft. See Removing and installing balancer.
4. Install cylinders. See Removing and installing cylinders.
5. Install cylinder heads. See Cylinder heads.
6. Install cylinder head covers. See Cylinder head covers.
7. Install clutch. See Removing and installing clutch.
8. Install starter. See Removing and installing starter.
9. Install engine. See Replace engine.
