
Prepare
1. Remove engine. See Replace engine.
2. Remove starter. See Removing and installing starter.
3. Remove clutch. See Removing and installing clutch.
4. Remove cylinder head covers. See Cylinder head covers.
5. Remove cylinder heads. See Cylinder heads.
6. Remove cylinders. See Removing and installing cylinders.
7. Remove balancer shaft. See Removing and installing balancer.
8. Remove output pulley. See Output pulley.
9. Separate crankcase. See Crankcase assembly.
Remove
| PART NUMBER | TOOL NAME |
| HD-51503 | CRANKSHAFT GUIDES |
1. See Figure 4-54. Remove crankshaft assembly from right crankcase half.
- a. Install CRANKSHAFT GUIDES (Part No. HD-51503).
- b. Remove crankshaft assembly.
Install
| PART NUMBER | TOOL NAME |
| HD-51503 | CRANKSHAFT GUIDES |
1. See Figure 4-54. Install crankshaft assembly into right crankcase half.
- a. Install CRANKSHAFT GUIDES (Part No. HD-51503).
- b. Install crankshaft assembly
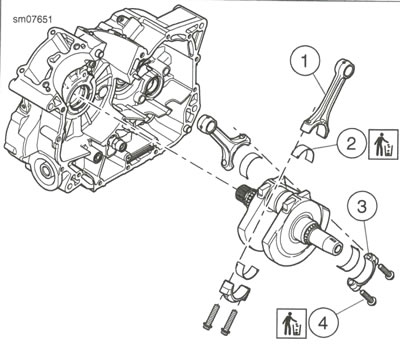
Figure 4-54. Crankshaft and Connecting Rods: 1. Connecting rod (2); 2. Bearing (4); 3. End cap (2); 4. Screw (4)
Disassemble
| PART NUMBER | TOOL NAME |
| HD-44358 | FLYWHEEL SUPPORT FIXTURE |
1. Secure crankshaft on FLYWHEEL SUPPORT FIXTURE (Part No. HD-44358).
- a. Place fixture in a vise.
- b. Secure crankshaft to fixture.
Notes:
- Mark direction of connecting rod and end cap assemblies before removal.
- Each connecting rod and end cap is a machined set. Do not interchange parts.
2. See Figure 4-54. Remove connecting rods.
- a. Discard screws (4).
- b. Discard bearings (2).
Clean and inspect
Warning: Compressed air can pierce the skin and flying debris from compressed air could cause serious eye injury. Wear safety glasses when working with compressed air. Never use your hand to check for air leaks or to determine air flow rates. (00061a)
1. Wash all parts with a non-flammable cleaning solvent. Dry with low-pressure compressed air.
2. Inspect the following areas for excessive wear and discoloration. Replace as necessary.
- a. Connecting rod journal
- b. Bearing surfaces
- c. Connecting rods
3. Clean oil passages.
Assemble
| FASTENER | TORQUE VALUE | |
| Connecting rod screws (first torque) | 19-23 Nm | 14-16 ft·lbs |
| Connecting rod screws (second torque) | 85-95 degrees | 85-95 degrees |
1. See Figure 4-55 and Figure 4-56. Select proper bearings. Refer to Table 4-27.
2. See Figure 4-54. Install new bearings (2).
- a. See Figure 4-57. Align notches in bearings with notches in connecting rods.
Notes:
- A new connecting rod and end cap assembly is installed in either direction.
- The existing connecting rod and end cap assembly is installed in the same direction it was removed from.
3. Install connecting rods.
- a. Lubricate threads of new screws (4) with engine oil.
- b. See Figure 4-58. Align dots.
- c. Install new screws. Tighten to 19-23 Nm (14-16 ft·lbs).
- d. Turn fasteners an additional 85-95 degrees (85-95 degrees).
Table 4-27. Connecting Rod Bearing Selection
| CRANKSHAFT ID | CONNECTING ROD ID | |
| A | В | |
| В | Blue | Black |
| A | Black | Red |
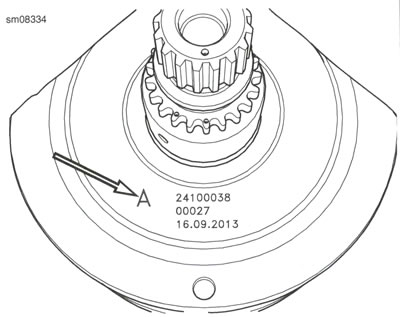
Figure 4-55. Crankshaft ID
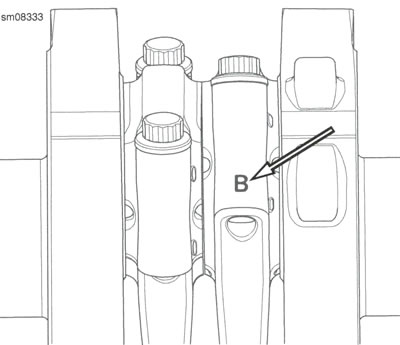
Figure 4-56. Connecting Rod ID
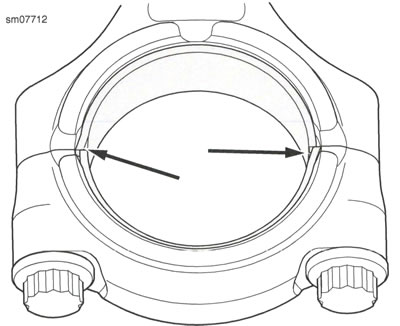
Figure 4-57. Connecting Rod Bearings

Figure 4-58. Connecting Rod Dots
Complete
1. Join crankcase halves. See Crankcase assembly.
2. Install output pulley. See Output pulley.
3. Install balancer shaft. See Removing and installing balancer.
4. Install cylinders. See Removing and installing cylinders.
5. Install cylinder heads. See Cylinder heads.
6. Install cylinder head covers. See Cylinder head covers.
7. Install clutch. See Removing and installing clutch.
8. Install starter. See Removing and installing starter.
9. Install engine. See Replace engine.