
Warning!
- Make sure the motorcycle is stabilised and adequately supported.
- A correctly supported motorcycle will help prevent it from falling.
- An unstable motorcycle may fall, causing injury to the operator or damage to the motorcycle.
- Note the original setting of the brake lever adjuster in order that it can be returned to the same position when the bleeding operation is complete. Turn the brake lever adjuster fully in.

1. Brake lever; 2. Adjusting screw
Master Cylinder Bleed
1. Turn the handlebars to bring the fluid reservoir to a level position.
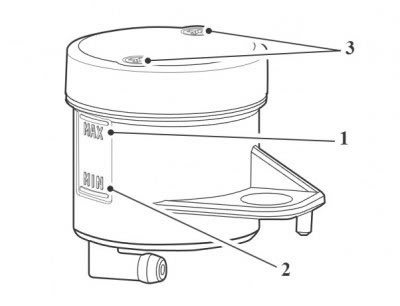
1. Front reservoir upper level; 2. Front reservoir lower level; 3. Screws
2. Remove the screws from the brake reservoir cover.
Warning! Ensure absolute cleanliness when adding brake fluid to the brake fluid reservoir. Do not allow moisture or debris to enter the cylinder as this will adversely affect the fluid properties. Always use fluid from a sealed container and do not use fluid from a container which has been opened for any period of time. Always check for fluid leakage around hydraulic fittings and for damage to hoses. A dangerous riding condition leading to an accident could result if this warning is ignored.
Caution! To prevent body damage, do not spill brake fluid onto any area of the bodywork.
3. Carefully remove the reservoir cover taking care not to spill any fluid.
4. Check the condition of the sealing diaphragm for the reservoir. Replace if necessary.
5. Remove the rubber cap from the bleed screw on the master cylinder.
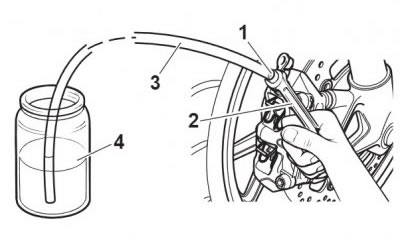
6. Attach a transparent tube to the bleed screw.

1. Bleed screw; 2. Spanner; 3. Bleed tube; 4. Container
7. Place the other end of the tube in a suitable receptacle.
8. Slowly apply then slowly release pressure to the brake lever five times, maintaining pressure on the final application.
Note: The bleed screws should only be opened by a small angle, just enough to allow system pressure to drop. When pulling the brake lever or pushing the caliper pistons in, some resistance should be felt indicating that the screw is not opened too much.
9. Briefly open and close the master cylinder bleed screw slightly, as per the note.
10. Repeat steps 8 and 9.
11. Slowly apply and slowly release pressure to the brake lever five times, maintaining pressure on the final application.
12. Open the bleed screw slightly to allow fluid to flow out but to still feel resistance in the brake lever.
13. Leave the bleed screw slightly open and slowly release the brake lever.
14. Slowly apply and release pressure to the brake lever five times, closing the bleed screw on the final application.
15. Repeat steps 8 to 14 until no more air appears in the bleed tube.
16. With the brake lever still under pressure, tighten the master cylinder bleed screw as specified in the Service Manual.
17. Fill the reservoir to the upper level with new DOT 4 fluid.
18. Remove the transparent bleed tube.
Manual Bleed
Note: The master cylinder should always be bled last. Bleed each caliper in turn before bleeding the master cylinder.
1. Remove the rubber cap from the bleed nipple on the right hand caliper.
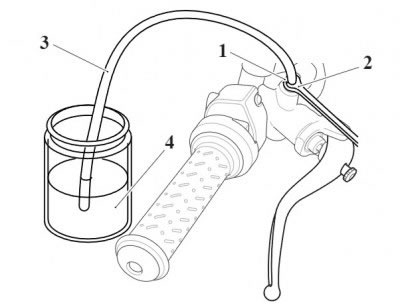
2. Attach a transparent tube to the bleed nipple.
1. Bleed nipple; 2. Spanner; 3. Bleed tube; 4. Container
3. Place the other end of the tube in a suitable receptacle containing new brake fluid.
4. Turn the handlebars to bring the fluid reservoir to a level position.

1. Front reservoir upper level; 2. Front reservoir lower level; 3. Screws
5. Remove the screws from the brake reservoir cover.
Warning! Ensure absolute cleanliness when adding brake fluid to the brake fluid reservoir. Do not allow moisture or debris to enter the cylinder as this will adversely affect the fluid properties. Always use fluid from a sealed container and do not use fluid from a container which has been opened for any period of time. Always check for fluid leakage around hydraulic fittings and for damage to hoses. A dangerous riding condition leading to an accident could result if this warning is ignored.
Caution! To prevent body damage, do not spill brake fluid onto any area of the bodywork.
6. Carefully remove the reservoir cover taking care not to spill any fluid.
7. Check the condition of the sealing diaphragm for the reservoir. Replace if necessary.
8. Release the bleed nipple.
Warning!
- Use only DOT 4 specification brake fluid as listed in the general information section of this manual. The use of brake fluids other than those DOT 4 fluids listed in the general information section may reduce the efficiency of the braking system leading to an accident.
- Observe the brake fluid handling warnings given earlier in this section of the manual.
Note: During bleeding, do not allow the fluid level to fall below the lower level mark in the reservoir. If the level is allowed to fall below this mark, air may enter the system and the sequence of bleeding must be repeated.
9. Slowly pull the brake lever to the handlebar and, holding the lever fully in, close the bleed nipple. Release the brake lever.
10. Repeat steps 8 and 9 until no more air appears in the bleed tube.
11. When all air has been expelled from the system, hold the lever in and close the bleed nipple. Tighten the nipple to 6 Nm.
12. Fill the reservoir to the upper level with new DOT 4 fluid.
13. Remove the transparent bleed tube and refit the rubber cap to the bleed nipple.
14. Repeat the bleeding procedure for the left hand caliper.
15. Repeat the bleed procedure for the bleed nipple on the master cylinder. Tighten the master cylinder bleed nipple to 14 Nm.
1. Bleed nipple; 2. Spanner; 3. Bleed tube; 4. Container
16. When both calipers and the master cylinder have been bled, ensure the brake lever operation has a firm resistive feel to it, does not feel spongy and that the lever cannot be pulled directly back to the handlebar. Take remedial action as necessary.
- Complete a second full brake bleed cycle.
- Fill the reservoir to the upper level with new DOT 4 fluid.
- Refit the reservoir diaphragm and cover. Secure the cover with its screws. Tighten the screws to 0.7 Nm.
Warning! Always return the lever adjuster to the original setting. Operating the motorcycle with lever settings which are unfamiliar may lead to loss of control or an accident.
- Reset the brake lever adjuster to the original setting.
- Check that the brake operates correctly. Rectify as necessary.
Warning! It is dangerous to operate the motorcycle with defective brakes; you must have your authorised Triumph dealer take remedial action before you attempt to ride the motorcycle again. Failure to take remedial action may reduce braking efficiency leading to loss of motorcycle control and an accident.