
Warning!
- Make sure the motorcycle is stabilised and adequately supported.
- A correctly supported motorcycle will help prevent it from falling.
- An unstable motorcycle may fall, causing injury to the operator or damage to the motorcycle.
1. Thoroughly clean the threaded fixing holes for the front fork brake caliper fixings.
2. Thoroughly clean the threaded part of the brake caliper fixings and smear the first four threads with a proprietary copper based grease.
3. Position the brake caliper over the disc.
4. Secure the brake caliper with the fixings and tighten sufficiently to bring the caliper into contact its mounting points, while allowing a small amount of lateral movement. Do not fully tighten at this stage.
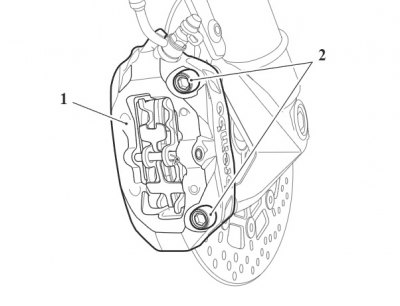
1. Caliper; 2. Fixings
Note: Before tightening, the brake caliper should be positioned such that it is aligned as centrally as possible over the brake disc.
5. Visually check the clearances between the caliper body and brake disc in the four locations shown below.

1. Caliper body; 2. Brake disc
6. Slide the caliper body inwards or outwards against its fixings as required to achieve the most equal clearances possible on either side of the brake disc.
7. Holding the caliper in position against its mounting fixings, tighten the fixings to 45 Nm.
Note: When the brake caliper is fitted, there must be a minimum gap of 0.3 mm between the caliper and brake disc.
8. Using feeler gauges, measure the gap between the brake disc and the caliper at the four measurement points shown in the following illustration. Minimum gap to be 0.3 mm.
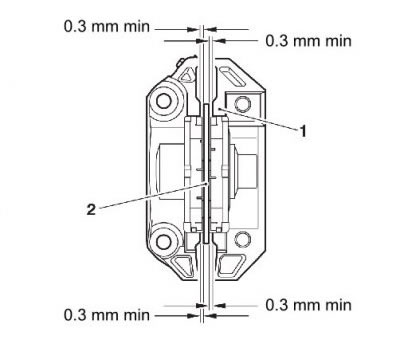
1. Caliper; 2. Brake disk
9. If necessary, loosen the caliper fixings and adjust the caliper alignment to achieve the minimum gap of 0.3 mm on all four measurement points. Re-tighten the bolts to 45 Nm.
10. If removed, refit the brake pads (see Front brake pads - installation).
11. Connect the brake hose(s) to the caliper incorporating new sealing washers on each side of the union(s). Ensure that the brake hose is located into its retaining lug on the mudguard.
12. Tighten the brake hose union bolt to 25 Nm.
Warning!
- Use only DOT 4 specification brake fluid as listed in the general information section of this manual. The use of brake fluids other than those DOT 4 fluids listed in the general information section may reduce the efficiency of the braking system leading to loss of motorcycle control and an accident.
- Observe the brake fluid handling warnings given earlier in this section of the manual.
Caution! To prevent paint damage, do not spill brake fluid onto any area of the bodywork. Spilled brake fluid will damage paintwork.
- Fill the master cylinder with new, DOT 4 brake fluid from a sealed container.
- Bleed the front brakes (see Bleeding the front brakes, renewing brake fluid).
- Check the brakes for correct operation. Rectify any faults as necessary.
Warning! It is dangerous to operate the motorcycle with defective brakes; you must have your authorised Triumph dealer take remedial action before you attempt to ride the motorcycle again. Failure to take remedial action may reduce braking efficiency leading to loss of motorcycle control and an accident.