
Warning!
- Make sure the motorcycle is stabilised and adequately supported.
- A correctly supported motorcycle will help prevent it from falling.
- An unstable motorcycle may fall, causing injury to the operator or damage to the motorcycle.
1. Locate the master cylinder to the handlebars and position the clamp with the mirror boss facing upwards.
2. Align the master cylinder/clamp split line with the alignment mark on the handlebar.
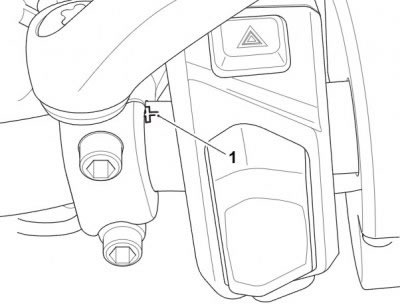
1. Alignment mark
3. Tighten the clamp bolts, upper first and then the lower to 8 Nm.
4. Connect the brake hose to the master cylinder incorporating new sealing washers. Tighten the union bolt to 25 Nm.
5. Attach the brake light switch to the master cylinder as noted during removal.
Warning!
- Use only DOT 4 specification brake fluid as listed in the General Information section of this manual. The use of brake fluids other than those DOT 4 fluids listed in the General Information section may reduce the efficiency of the braking system leading to loss of motorcycle control and an accident.
- Observe the brake fluid handling warnings given earlier in this section of the manual.
6. Fill and bleed the front brakes (see Bleeding the front brakes, renewing brake fluid).
Warning! Always return the lever adjuster to the original setting noted during removal. Operating the motorcycle with lever settings which are unfamiliar may lead to loss of control or an accident.
7. Reset the brake lever adjuster to the original setting.
8. Examine the system for correct operation and fluid leaks. Rectify as necessary.
Perform the following operations:
- Battery - installation
- Seat - installation
- Check for correct brake operation. Rectify as necessary.
Warning! It is dangerous to operate the motorcycle with defective brakes; you must have your authorised Triumph dealer take remedial action before you attempt to ride the motorcycle again. Failure to take remedial action may reduce braking efficiency leading to loss of motorcycle control and an accident.