
Warning: Prolonged or repeated contact with engine oil can lead to skin dryness, irritation and dermatitis. Furthermore, used engine oil contains potentially harmful contaminants which can cause cancer. When handling used engine .oil, always wear protective clothing and avoid any skin contact with the oil.
Caution: Do not pour engine oil on the ground, down sewers or drains, or into water courses. To prevent pollution of water courses etc., dispose of used oil sensibly. If in doubt contact your local authority.
Removal
Note: The oil pump and water pump are supplied as an assembly and cannot be separated. This procedure covers the removal of the oil and water pump assembly.
1. Remove the rider's seat (see page 16-13).
2. Disconnect the battery, negative (black) lead first.
3. Drain the coolant (see page 11-5).
4. Drain the engine oil (see page 8-7).
Warning: The oil may be hot to the touch. Contact with hot oil may cause the skin to be scalded or burned.
Warning: Prolonged or repeated contact with engine oil can lead to skin dryness, irritation and dermatitis. In addition used engine oil contains potentially harmful contaminants which can cause cancer. Wear suitable clothing and avoid skin contact.
5. Remove the sump (see page 8-15).
6. Remove the clutch (see page 4-6).
7. Release and discard the two fixings and remove the oil transfer pipe. Remove and discard the two O-ring seals.
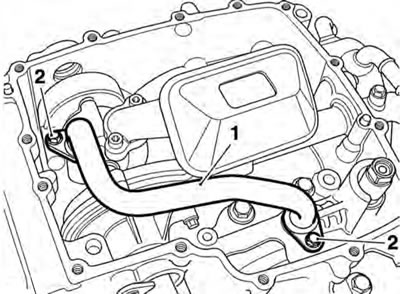
1. Oil transfer pipe; 2. Fixings
8. Release and discard the two fixings and remove the oil pick-up. Remove and discard the O-ring seal.
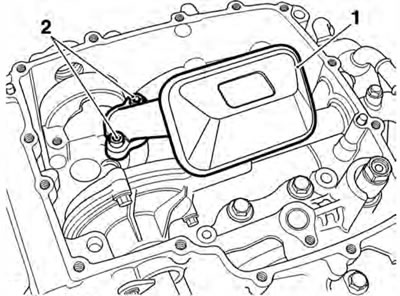
1. Oil pick-up; 2. Fixings
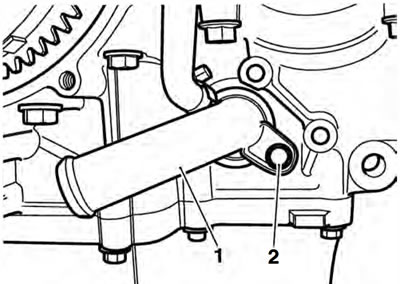
9. Remove and discard the bolt securing the coolant inlet elbow to the crankcase and withdraw the elbow. Remove and discard the O-ring from the elbow.
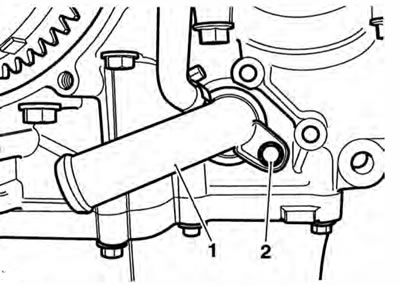
1. Coolant inlet elbow; 2. Fixing
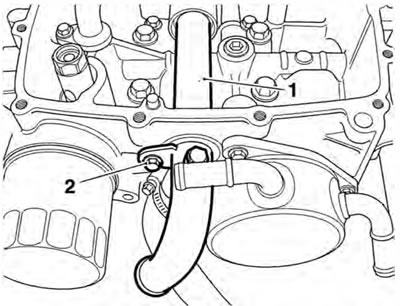
10. Remove and discard the bolt securing the coolant outlet pipe to the crankcase and withdraw the pipe. Remove and discard the three O-rings from the pipe.
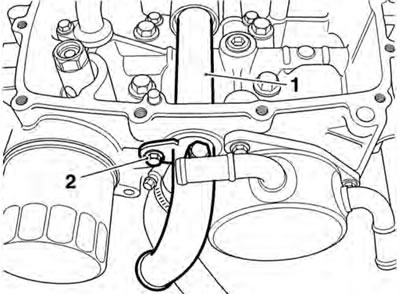
1. Coolant outlet pipe; 2. Fixing
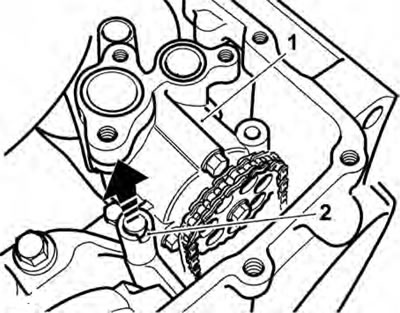
11. Release the fixings securing the drive chain guide to the crankcase and remove the guide.
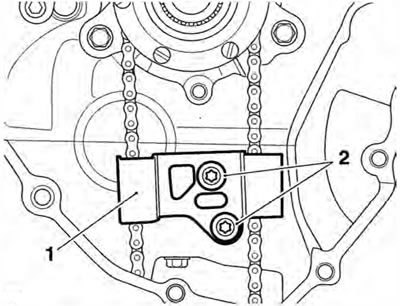
1. Oil pump drive chain guide; 2. Fixings
12. Slide the oil pump drive sprocket gently backwards and forwards to dislodge the inner needle roller bearing.
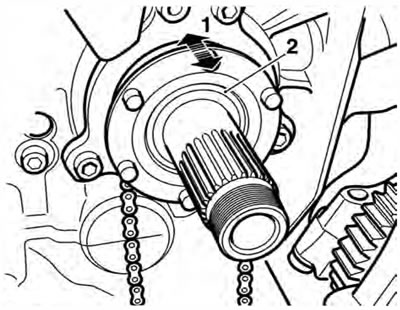
1. Oil pump drive sprocket; 2. Needle roller bearing
13. Carefully remove the bearing while supporting the oil pump drive sprocket.
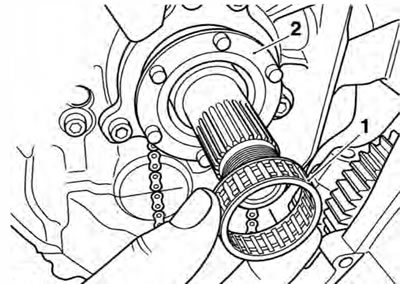
1. Needle roller bearing; 2. Oil pump drive sprocket
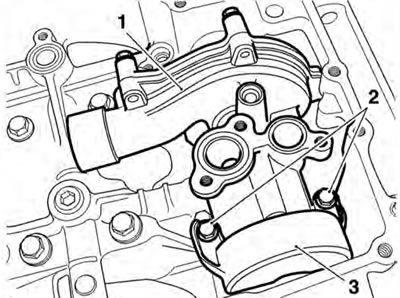
14. Release the fixings securing the drive chain cover to the oil pump. Remove the drive chain cover.
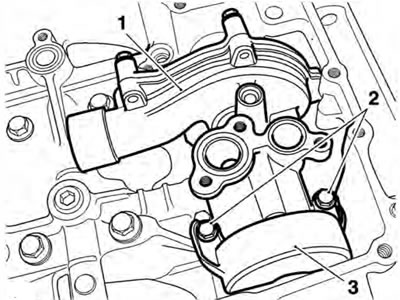
1. Oil pump; 2. Fixings; 3. Drive chain cover
15. Using a suitable tool, slide the dowel upwards to release the oil pump from the crankcase. lt is not necessary to remove the dowel com pletely from the oil pump.
1. Oil pump; 2. Dowel
16. Detach the drive chain from the oil pump.
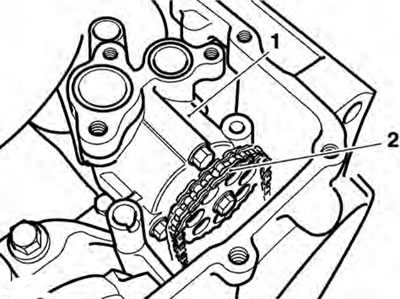
1. Oil pump; 2. Drive chain
17. Carefully withdraw the oil pump from the crankcase.
18. Remove and discard th e O-ring from the inlet sleeve on the water pump body.
Inspection
1. Release the fixing and remove the drive sprocket and spacer washer.
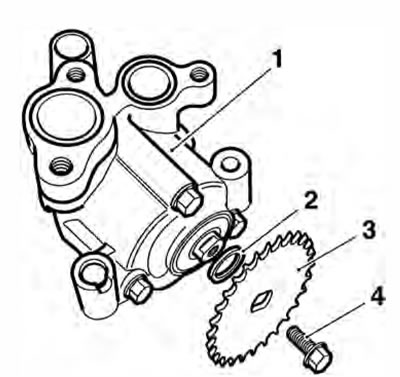
1. Oil pump; 2. Spa cer washer; 3. Drive sprocket; 4. Fixing
2. Release the three fixings and withdraw the oil pump body.
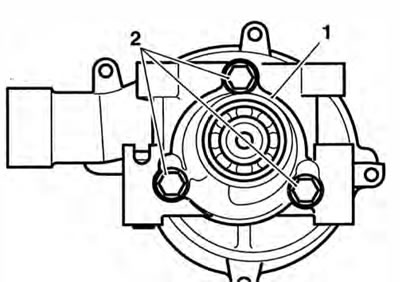
1. Oil pump body; 2. Fixings
Caution: If any part of the oil pump is found to be outside the service limit, the complete pump must be replaced. Severe engine damage may result from the continued use of a faulty oil pump.
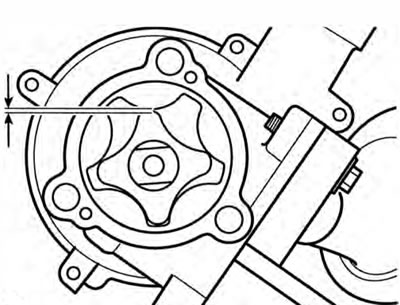
3. Measure the rotor tip clearance using feeler gauges.
Rotor Tip Clearance
- Standard: 0.15 mm
- Service limit: 0.20 mm
Rotor Tip Clearance
4. Measure the pump body clearance using feeler gauges.
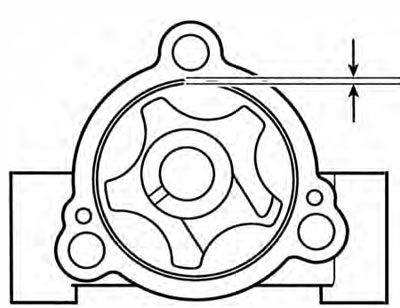
Pump Body Clearance
Pump Body Clearance
- Standard: 0.15 - 0.22 mm
- Service limit: 0.35 mm
5. Measure the pump end clearance.
Pump End Clearance
- Standard: 0.04 - 0.09 mm
- Service limit: 0.17 mm
Assembly
1. If all clearances are within service limits, liberally apply clean engine oil to all internal components and refit the oil pump body to the oil pump rotor. Refit the fixings and tighten to 12 Nm.
2. If any clearance measured is outside the service limits, renew the complete pump.
3. Inspect the sprockets and chain for wear and/or damage. Replace the sprockets and chain if wear and/or damage is found.
4. Check the water pump shaft and shaft bearings for side and end float. Renew if necessary.
5. Check for corrosion and scale build-up around the impeller and in the pump body. Renew if necessary.
6. Check the oil pump location dowel for damage. Renew if necessary.
7. Refit the spacer washer and drive sprocket. Apply ThreeBond 1374 to the fixing and tighten to 12 Nm.
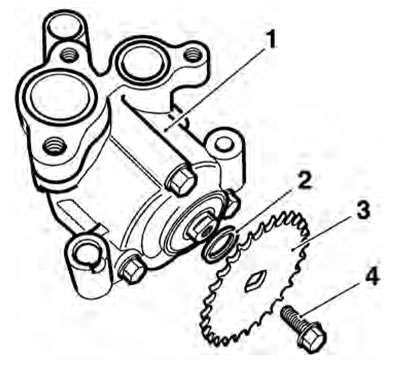
1. Oil pump; 2. Spacer washer; 3. Drive sprocket; 4. Fixing
Installation
Caution: Before fitting the oil pump to the crankcase ensure the pump internal surfaces have been 'wetted' with clean engine oil. The pump may fail to pick-up oil from the sump if the surfaces have not been 'wetted'. This will cause the engine to run without engine oil pressure and will lead to severe engine damage.
1. Install a new O-ring to the inlet sleeve on the water pump body.
2. Fill the oil pump with new engine oil, turning the pump rotor as the oil is poured in to ensure all surfaces are coated with oil.
3. Position the oil pump to the crankcase and insert the water pump inlet sleeve into the opening in the crankcase.
4. Fit the oil pump to the crankcase, ensuring the oil pump dowel correctly locates into the bolt hole in the crankcase.
Caution: Do not use excessive force to insert the dowel into the crankcase. Severe dowel or crankcase damage may result from the use of excessive force.
5. Using a suitable pin punch, gently tap the dowel downwards into the crankcase until it seats.
6. Feed the drive chain over the transmission input shaft and fit to the sprocket.
7. Fit the drive chain to the sprocket on the oil pump.
8. Support the oil pump drive sprocket and carefully refit the needle roller bearing.
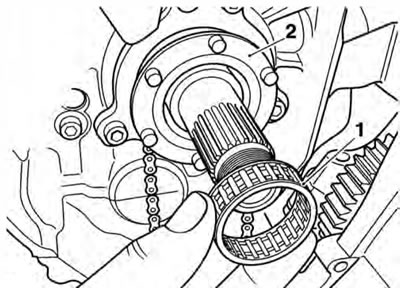
1. Needle roller bearing; 2. Oil pump drive sprocket
9. Refit the oil pump drive chain cover to the oil pump and fit new bolts. Tighten the bolts to 12 Nm.
1. Oil pump; 2. Fixings; 3. Drive chain cover
10. Refit the oil pump drive chain guide. Install new fixings and tighten to 9 Nm.
11. Install a new О-ring to the coolant inlet elbow and position the elbow to the water pump inlet. Fit a new bolt and tighten to 12 Nm.
1. Coolant inlet elbow; 2. Fixing
12. Install three new О-rings to the coolant outlet pipe and position the pipe through the crankcase, locating it to the water pump outlet. Install a new fixing and tighten to 12 Nm.
1. Coolant outlet pipe; 2. Fixing
13. Install a new O-ring to the oil pick-up and refit the oil pick-up. Fit new bolts and tighten to 12 Nm.
14. Install two new O-rings to the oil transfer pipe and refit the oil transfer pipe. Fit new bolts and tighten to 12 Nm.
15. Refit the clutch (see page 4-10).
16. Refit the sump, ensuring the water pump drain tube is correctly installed (see page 8-16).
17. Reconnect the battery, positive (red lead) first.
18. Refit the rider's seat (see page 16-13).
19. Refill the engine with oil (see page 8-7).
20. Refill the cooling system (see page 11-5).