
Checking valve clearances
Preparatory work
Remove left, right and centre covers.
Remove the battery.
Removing the intake air silencer together with the intake air pipe
Remove the fastener for the intake air silencer from the oil tank.
Remove the fasteners for the intake air silencer from the retainer.
Remove the starter relay from the holder.
Slacken the fasteners for the lid of the electronic equipment box.
Remove the fasteners for the battery tray.
Disengage the clamp securing the breather hose and disconnect the hose from the intake air silencer.
Press the oil tank slightly to the left and carefully disconnect the intake air silencer from the throttle flap stub.
Pull the intake air silencer with intake air pipe and battery carrier to the rear to remove.
Cover/seal the throttle flap stub.
Exposing the radiator

Note: When temporarily securing the expansion tank, make sure that the cap is above the level of the coolant.
Disconnect the expansion tank from the radiator, pull it to one side and temporarily secure it to the handlebar with a cable tie or similar.
Unclip the MoDiTeC plug from its holder.
Disconnect plug for fan.
Disengage the clips at top and bottom and remove the fan.
Protect the interior of the radiator with cardboard or similar.
Exposing cylinder head
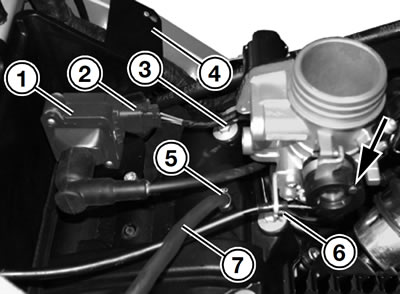
Disconnect ignition coil at plug (2).
Pull spark plug connector off spark plug.
Remove screws securing ignition coil (1) to cylinder head cover.
Disengage throttle cable from adapter (arrow).
Remove circlip (6) from throttle-cable holder and disengage throttle cable.
Disengage cover (4) from the anchorages on main frame on each side and remove.
Remove spark plug.
Use pliers, BMW No. 175500, to release hose clip (5) and disconnect cylinder-head breather hose (7).
Note: Note the position of the two anchorages for ignition coil (1) on the cylinder-head cover.
Remove 8 fasteners (3) and remove the cylinderhead cover with gasket.
Turning crankshaft to TDC position
Remove the central threaded plug in the magnetic housing.
Use an Allen key to turn the crankshaft clockwise to the TDC position.
Checking valve clearance

Use a feeler gauge (arrow) to determine valve clearance.
Make a note of the valve clearances, or adjust them if necessary.
Valve clearances:
- Inlet valve: 0.05...0.10 m (0.002...0.004 in)
- Exhaust valve: 0.25...0.30 mm (0.010...0.012 in)
Adjusting valve clearances

Secure yoke of valve-clearance adjuster, BMWNo. 117501, to the cylinder head.
Seal the aperture in the cylinder head with the cover plate (arrow).
Turn the camshaft until the points of the cams are up.
Note: Thruster toward outer edge of cylinder head.
Install shaft, BMW No. 11 7 502, thruster, BMW No. 117503, and clamp block, BMW No. 117504.
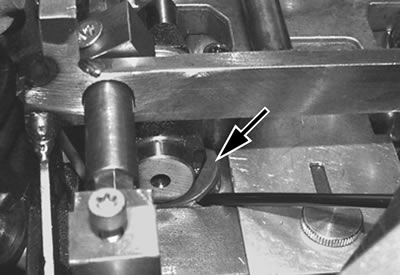
Turn the bucket tappet until the shim (arrow) can be levered out at the groove in the bucket tappet.
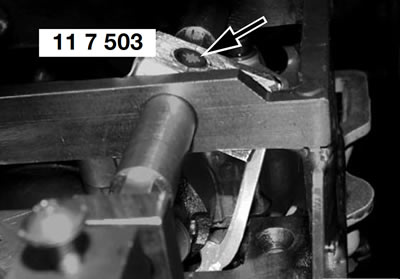
Secure thruster, BMWNo. 117503, on the shaft by tightening the screw (arrow).
Position thruster, BMW No. 11 7 503, on the edge of the bucket tappet.
Press down the bucket tappet and secure shaft, BMW No. 11 7 502, with clamp block, BMW No. 11 7 504.
Note: If the shim is too tight to be removed easily, the hold-down assembly is sitting on the shim instead of on the edge of the bucket tappet. If this happens back off the hold-down assembly and repeat the procedure.
Release the shim with a screwdriver or similar tool, then use magnetic holder, BMW No. 11 7 505, to remove.
Before installing new shim, check thickness with a micrometer.
Position the shim in the bucket tappet.
Carefully release the clamp on the shaft, then remove the shaft and the hold-down assembly.
Caution! Check that the shim is correctly seated in the bucket tappet.
Installation is the reverse of the removal procedure: pay particular attention to the following.
Installing cylinder head cover
Before installing the cylinder head cover, remove all traces of the gasket and clean the sealing face with degreasing agent. Also clean the groove and the seating faces for the gasket.
Installing fan shroud

Engage the tabs at the top and bottom of fan shroud (2) in the hooks on the radiator (1).
Installing intake air silencer
Note: Do not reinstall the intake air silencer at this stage, if the fuel filter has to be removed.
Make sure that the intake pipe is correctly seated on the throttle flap stub.
Installing the intake air duct
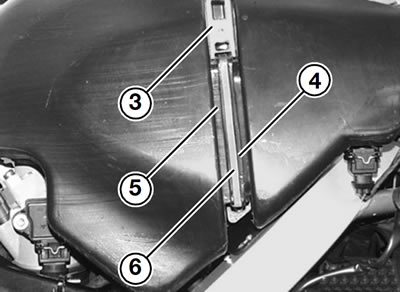
Introduce the fits of intake air silencer (5) with air filter element (6) and intake air duct (4) into the guide on the battery tray (3) and connecting flange.
If necessary, top up the coolant level in the expansion tank.
Valve clearances:
- Inlet valve: 0.05...0.10 m (0.002...0.004 in)
- Exhaust valve: 0.25...0.30 mm (0.010...0.012 in)
Tightening torques:
- Cylinder head cover to cylinder head: 10 Nm
- Ignition coil to cylinder head: 9 Nm
- Lid of electronic equipment box: 4 Nm
- Spark plug in cylinder head: 20 Nm
- Oil tank to intake air silencer: 9 Nm
- Intake air silencer to frame: 9 Nm
- Connecting flange, air filter box to battery tray: 5 Nm
- Expansion tank to radiator: 9 Nm
- Trim panel/cover: 3 Nm