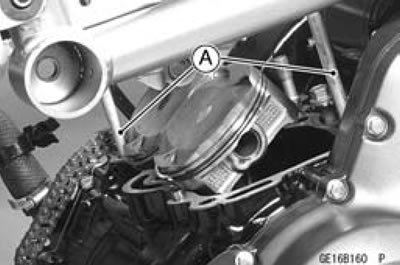
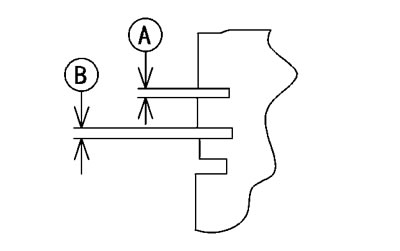
- Cylinder Head (See Cylinder Head Removal)
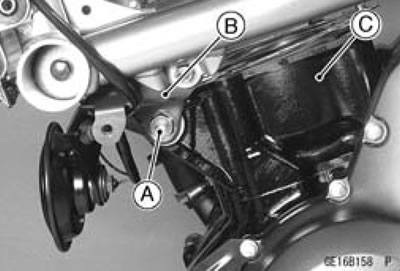
- Front Engine Mounting Bolts (Both Sides) [A] (See Engine Removal in the Engine Removal/Installation chapter)
- Front Engine Brackets (Both Sides) [B] (See Engine Removal in the Engine Removal/Installation chapter)
- Cylinder [C]
Cylinder Installation
Note: If a new cylinder is used, use new piston ring.
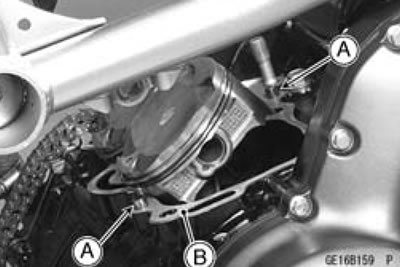
- Install the dowel pins [A] and new cylinder gasket [B].
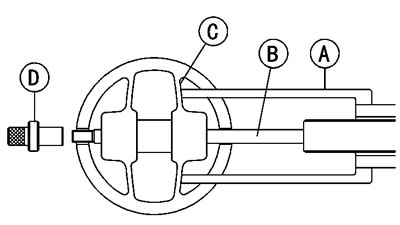
- Remove the piston pins.
Special Tools - Piston Pin Puller [A]: 57001-1568
Piston Pin Puller Adapter C [D]: 57001-1657
- Center Bolt [B]
- Shell of Piston [C]
- Remove the pistons.
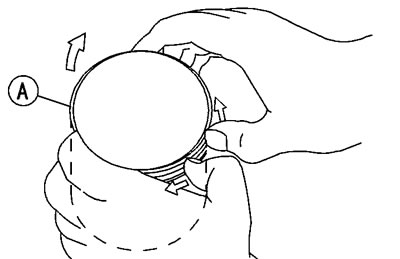
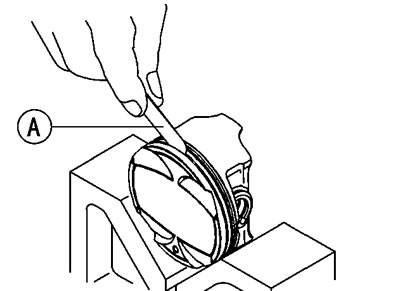
- Carefully spread the ring opening with your thumbs and then push up on the opposite side of the ring [A] to remove it.
- Remove the 3-piece oil ring with your thumbs in the same manner.
Piston Installation
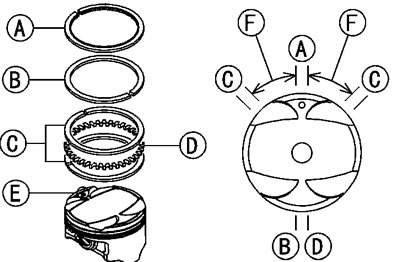
- Apply molybdenum disulfide oil solution to the oil ring expander, install the oil ring expander [A] in the bottom piston ring groove so the ends [B] butt together.
- Apply molybdenum disulfide oil solution to the oil ring steel rails, and install the oil ring steel rails, one above the expander and one below it.
Spread the rail with your thumbs, but only enough to fit the rail over the piston.
Release the rail into the bottom piston ring groove.
Note: The oil ring rails have no "top" or "bottom".
- Apply molybdenum disulfide oil solution to the top and second rings.
- Do not mix up the top and second ring.
- Install the top ring [A] so that the "R" mark [B] faces up.
- Install the second ring [C] so that the "RN" mark [D] faces up.
Note: If a new piston is used, use new piston ring.
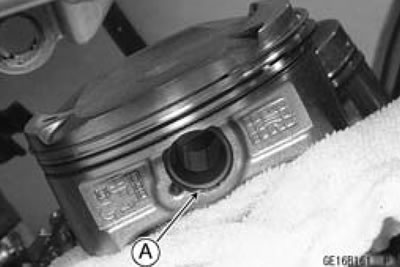
- Install the piston with its marking hollow [A] facing forward.
- Fit a new piston pin snap ring into the side of the piston so that the ring opening [A] does not coincide with the slit [B] of the piston pin hole.
Apply molybdenum disulfide oil solution to the piston pins and piston skirt.
When installing the piston pin snap ring, compress it only enough to install it and no more.
Caution: Do not reuse snap rings, as removal weakens and deforms them. They could fall out and score the cylinder wall.
- Install the cylinder (See Cylinder Installation).
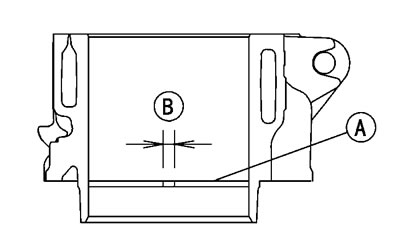
Cylinder Wear
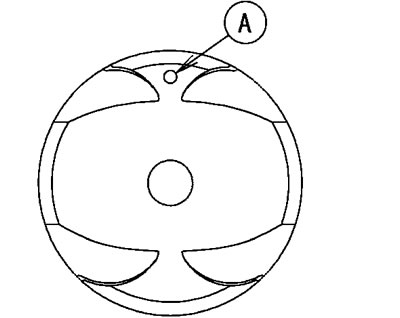
- Since there is a difference in cylinder wear in different directions, take a side-to-side and a front-to-back measurement at each of the two locations (total of four measurements) shown in the figure.
If any of the cylinder inside diameter measurements exceeds the service limit, replace the cylinder.
- 10 mm (0.39 in.) [A]
- 60 mm (2.36 in.) [B]
Cylinder Inside Diameter
Standard: 82.994-83.006 mm (3.2675-3.2679 in.)
Service Limit: 83.10 mm (3.272 in.)
Piston Wear
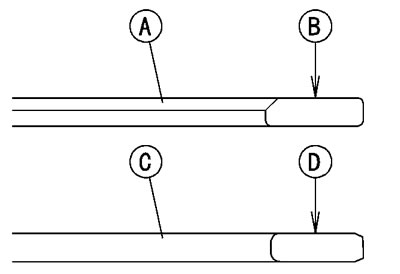
- Measure the outside diameter [A] of each piston 18 mm (0.7087 in.) [B] up from the bottom of the piston at a right angle to the direction of the piston pin.
If the measurement is under service limit, replace the piston.
Piston Diameter
Standard: 82.969-82.984 mm (3.2665-3.2671 in.)
Service Limit: 82.82 mm (3.261 in.)
Piston Ring, Piston Ring Groove Wear
- Check for uneven groove wear by inspecting the ring seating.
The rings should fit perfectly parallel to groove surfaces. If not, replace the piston and all the piston rings.
- With the piston rings in their grooves, make several measurements with a thickness gauge [A] to determine piston ring/groove clearance.
Piston Ring/Groove Clearance
Top
Standard: 0.03-0.07 mm (0.0012-0.0028 in.)
Service Limit: 0.17 mm (0.0067 in.)
Second
Standard: 0.02-0.06 mm (0.0008-0.0024 in.)
Service Limit: 0.16 mm (0.0063 in.)
Piston Ring Groove Width
- Measure the piston ring groove width.
Use a vernier caliper at several points around the piston.
Piston Ring Groove Width
Top [A]
Standard: 0.92-0.94 mm (0.0362-0.0370 in.)
Service Limit: 1.02 mm (0.040 in.)
Second [B]
Standard: 1.01-1.03 mm (0.0398-0.0406 in.)
Service Limit: 1.11 mm (0.044 in.)
If the width of any of the two grooves is wider than the service limit at any point, replace the piston.
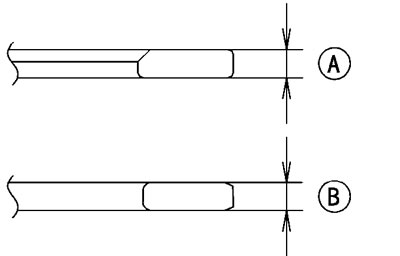
Piston Ring Thickness
- Measure the piston ring thickness.
Use the micrometer to measure at several points around the ring.
Piston Ring Thickness
Top [A]
Standard: 0.87-0.89 mm (0.0342-0.0350 in.)
Service Limit: 0.80 mm (0.032 in.)
Second [B]
Standard: 0.97-0.99 mm (0.0382-0.0390 in.)
Service Limit: 0.90 mm (0.035 in.)
If any of the measurements is less than the service limit on either of the rings, replace all the rings.
Note: When using new rings in a used piston, check for uneven groove wear. The rings should fit perfectly parallel to the groove sides. If not, replace the piston.
Piston Ring End Gap
- Place the piston ring [A] inside the cylinder, using the piston to locate the ring squarely in place. Set it close to the bottom of the cylinder, where cylinder wear is low.
- Measure the gap [B] between the ends of the ring with a thickness gauge.
Piston Ring End Gap
Top
Standard: 0.25-0.40 mm (0.0098-0.0157 in.)
Service Limit: 0.7 mm (0.028 in.)
Second
Standard: 0.40-0.55 mm (0.0157-0.0217 in.)
Service Limit: 0.8 mm (0.031 in.)
If the end gap of either ring is greater than the service limit, replace all the rings.