MotoInstruction.ru
Mobile
version
Articles
& news
Site
map
Feed
back
Add to
bookmark
English Русский
Aprilia
BMW
Ducati
Harley
Honda
Kawasaki
Suzuki
Triumph
Yamaha
Triumph:
Rocket▾
Rocket III (2004-2018)
Street Triple▾
765 R/RS [4] (2017-2024)
Tiger▾
Tiger 800 (2010-2019)

Crankshaft — removal and installation (Triumph Rocket III)

  • Main
  • Triumph
  • Rocket
  • Rocket III
  • Engine and systems
  • Engine repair
  • Crankshaft — removal and insta…
0
Contents: Removal ↓ Installation ↓

Removal


1. Remove the engine from the frame (see page 10.2).

2. Separate the lower and upper crankcases (see page 5.5).

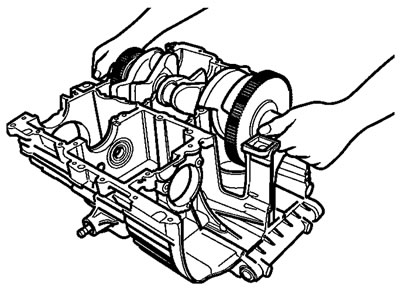
3. Lift the balancer out of the upper crankcase.

Removing the balancer

Removing the balancer


4. Remove the connecting rod big end caps (see page 5.10). Discard the bolts after removal.

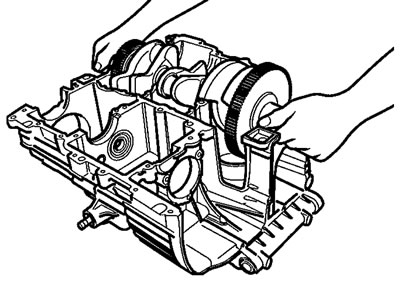
5. Lift the crankshaft from the upper crankcase. Support the connecting rods during crankshaft removal to prevent damage to the rods, liners and upper crankcase.

Removing the crankshaft

Removing the crankshaft


Installation


Caution! Always check the main bearing journal clearance (see page 5.13), before final assembly of the crankshaft. Failure to correctly select crankshaft bearings will result in severe engine damage.


1. Select and fit new main and big end bearing shells using the selection processes detailed on pages 5.12 and 5.13.


2. Lubricate all bearings with engine oil.

3. Ensure that the crankshaft is clean, and that the oil ways within the crankshaft are clean and free from blockages and debris.

4. Install the crankshaft ensuring that the crankpins align with the corresponding big ends.

Installing the crankshaft

Installing the crankshaft


5. Align the connecting rod big ends to the crankpins.

6. Fit the big end caps and tighten them (see page 5.10 for the tightening sequence and torque).

7. Install the balancer (see page 7.4).

8. Assemble the crankcases (see page 5.7).

(The article is reprinted from the website Motoinstruction)
See this article in russian language
This article has been reviewed: Serafim Sazonov
◀ Previous
Triumph Rocket III : Engine repair
Next ▶

Crankcases — removal and installation
Exploded view — crankcase and liners
Exploded view — crankcase fixings
Exploded view — crankshaft, connecting rod and piston
Connecting rods — removal and installation
Connecting rod big end bearing selection/crankpin wear check
Crankshaft main bearing/journal wear
Pistons — disassembly and assembly
Similar articles about motorcycles of other brands
Crankshaft and transmission exploded view Kawasaki ZX6R/ZX600J (2000-2002)
Crankshaft journal runout Suzuki DRZ 250 (1996-2007)
Removing the crankshaft position sensor Yamaha FZ1 Fazer (2006-2015)
Service information of crankshaft and transmission Honda VTX 1800 C (2001-2008)
Crankshaft bearing replacement Harley-Davidson V-Rod (2002-2006)
Link to this article in different formats
Comments and feedback from visitors
No comments yet, you will be the first!


Add up two numbers: 32 + 34


Rocket III (2004-2018) 
  • Information for owner
  • Introduction to manual
  • Engine and systems
  • Engine repair
  • Cooling system
  • Lube system
  • Fuel and control system
  • Transmission
  • Running gear and frame
  • Frame and hinged elements
  • Front suspension and handlebar
  • Rear suspension
  • Brake system
  • Wheels and tires
  • Electric equipment
  • Equipment and devices
  • Starting and charging system
  • Electrical circuits
Aprilia BMW Ducati Harley Honda Kawasaki Suzuki Triumph Yamaha
MotoInstruction.ru © 2021–2026 | Sitemap | Articles | Contacts | | Add to bookmarks | Mobile version