
The clutch pack height is critical for a smooth operation of the gear change and needs to be measured prior to installation.
If used steel plates are being fitted, the clutch pack height measurement is not necessary, as the plates may not be worn to the service limit (and are therefore still serviceable), but could fall outside the clutch pack height tolerance when measured.
If building a new clutch pack, its height must be correct. To achieve this, build the new clutch pack with the following:
- 2 x new outer friction plate
- 6 x new friction plates
- 1 x new inner friction plate
- 7 x steel plates, 2.0 mm thick
- 1 x outer steel plate, 2.0 mm thick.
Friction plate and steel plate arrangement
1. Arrange the new friction and new steel plates in a stack as shown below.
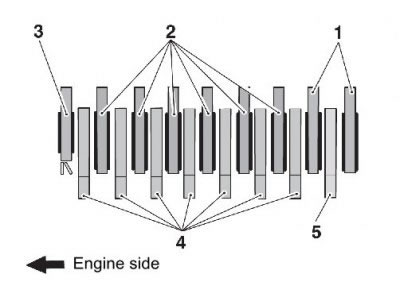
1. Outer friction plates; 2. Friction plates; 3. Inner friction plate; 4. Steel plate, 2.0 mm thickness; 5. Outer steel plate, 2.0 mm thickness
2. Place the assembled clutch pack on a flat surface and measure its height as shown below.

1. Clutch pack height
3. For the correct clutch pack height for this clutch assembly see Clutch and Primary Drive.
4. If the clutch pack is too high, continue from step 5, omit step 6 then continue from step 7. If the clutch pack is too low, continue from step 6.
Note: 1.6 mm and 2.3 mm steel plates are available, refer to the Parts Catalogue for part numbers. No more than one 1.6 mm thick steel plate is to be used in the clutch pack.
5. If the clutch pack height is too high, replace the 2.0 mm steel plate indicated below with a new 1.6 mm steel plate.

1. 2.0 mm steel plate to be replaced
Note: No more than one 2.3 mm thick steel plate is to be used in the clutch pack.
6. If the clutch pack height is too low, replace the 2.0 mm steel plate indicated below with a new 2.3 mm steel plate.
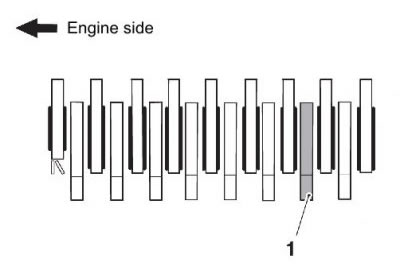
1. 2.0 mm steel plate to be replaced
7. Re-check the clutch pack height as described earlier.