MotoInstruction.ru
Mobile
version
Articles
& news
Site
map
Feed
back
Add to
bookmark
English Русский
Aprilia
BMW
Ducati
Harley
Honda
Kawasaki
Suzuki
Triumph
Yamaha
Triumph:
Rocket▾
Rocket III (2004-2018)
Street Triple▾
765 R/RS [4] (2017-2024)
Tiger▾
Tiger 800 (2010-2019)

Clutch cable — removal (Triumph Street Triple 765 R/RS)

  • Main
  • Triumph
  • Street Triple
  • 765 R/RS [4]
  • Engine and systems
  • Transmission
  • Clutch cable — removal
0
Warning!
  • Make sure the motorcycle is stabilised and adequately supported.
  • A correctly supported motorcycle will help prevent it from falling.
  • An unstable motorcycle may fall, causing injury to the operator or damage to the motorcycle.


Perform the following operations:
  • Seat - removal
  • Battery - removal
  • Side panel - removal

Note: Note the routing of the clutch cable and the position of the retaining clips/grommets for installation.


1. Detach the clutch cable retaining clip from its bracket.

2. Loosen the cable lock nut and release the adjuster at the clutch cover end to give maximum play in the cable.


1. Clutch cable; 2. Adjuster; 3. Clip; 4. Bracket


3. Release the clutch cable from the actuating arm by pushing the inner cable nipple through the arm and sliding the cable out of the slot. Detach the cable from the bracket.


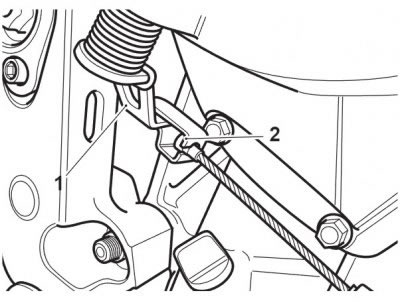
1. Actuating arm; 2. Inner cable nipple


4. Align the cable adjuster and lever bracket slots.

5. Pull in the clutch lever and turn the inner cable, anticlockwise through the slots in the adjuster and lock nut, until the cable can be detached from the lever by pushing downwards.


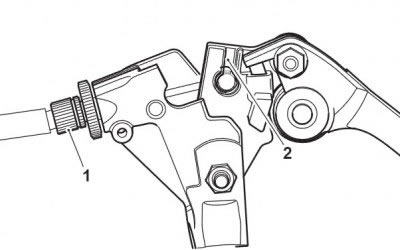
1. Cable adjuster/lever bracket slots; 2. Cable release point


6. Detach the clutch cable retaining clip from the top of the radiator.


1. Hose clip; 2. Bypass hose; 3. Retaining clip; 4. Clutch cable


7. Remove and discard one of the fixings for the headstock cable guide and remove the clutch cable.


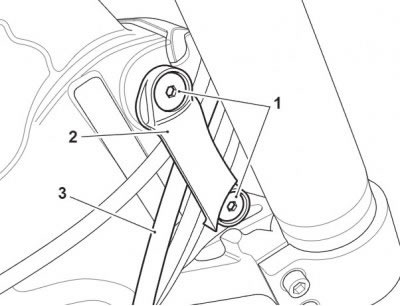
1. Fixings; 2. Cable guide; 3. Clutch cable
See this article in russian language
◀ Previous
Triumph 765 R/RS 4: Transmission
Next ▶

Clutch assembly — exploded view
Clutch cable — inspection
Clutch cable — installation
Clutch — removal
Friction plate inspection
Steel plate inspection
Clutch pack height
Similar articles about motorcycles of other brands
Honda CB 400 SF (1992-1999): Clutch cable — removal and installation, adjustment Kawasaki ZX6R/ZX600J (2000-2002): Clutch cable — removal and installation Aprilia RS 125/3 (1998-2005): Removing the clutch cable Yamaha FZ1 Fazer (2006-2015): Adjusting the clutch cable free play БМВ F 650 GS (2000-2007): Removing and installing clutch cable Suzuki V-Strom DL-650 (2004-2011): Clutch cable routing Harley-Davidson V-Rod (2002-2006): Manual clutch lever Ducati ST2 (1997-2003): Changing the clutch fluid
Link to this article in different formats
TEXTHTMLBB Code
Comments and feedback from visitors
No comments yet, you will be the first!


Add up two numbers: 40 + 10


765 R/RS 4 (2017-2024) 
  • Information for owner
  • Introduction to manual
  • Engine and systems
  • Engine repair
  • Fuel and control system
  • Lubrication system
  • Cooling system
  • Transmission
  • Running gear and frame
  • Frame and hinged elements
  • Front suspension and handlebar
  • Rear suspension
  • Brake system
  • Wheels and tires
  • Electric equipment
  • Equipment and devices
  • Starting and charging system
  • Electrical circuits
Aprilia BMW Ducati Harley Honda Kawasaki Suzuki Triumph Yamaha
MotoInstruction.ru © 2021–2025 | Sitemap | Articles | Contacts | Site search | Add to bookmarks | Mobile version