
Removal
1. Remove the rider's seat (see page 16-13).
2. Disconnect the battery, negative (black) lead first.
3. Remove the starter motor (see page 17-18).
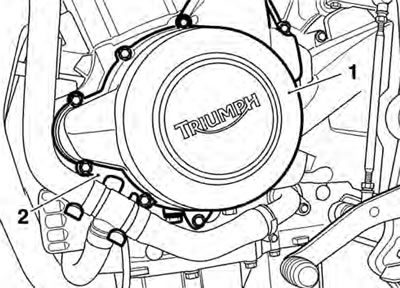
4. Release the bolts securing the left hand engine cover. Collect the bottom hose bracket from under the front two bolts. Note the positions of the two different bolt lengths. Discard the 35 mm bolts.
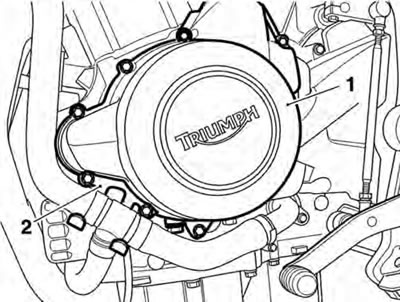
1. Left hand engine cover; 2. Bottom hose bracket
5. Withdraw the cover from the crankcase against the pull of the alternator magnet.
6. To remove the stator from the cover, release the three bolts in the centre of the cover and release the bolt securing the cable bracket. Discard the bolts.
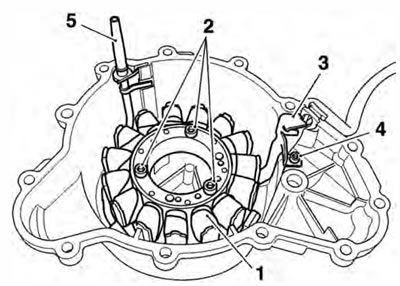
1. Stator; 2. Stator fixings; 3. Cable bracket; 4. Cable bracket fixing; 5. Alternator spray bar; 6. Withdraw the stator.
Caution: Do not use tools to tighten service tool T3880375. Tighten the tool by hand only. Over-tightening of the tool will lead to damage to the alternator rotor.
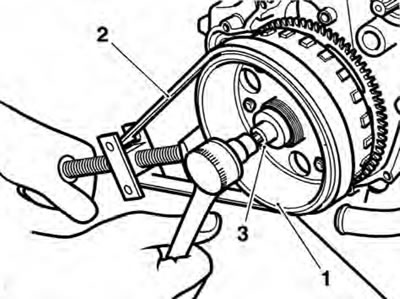
8. To remove the rotor, clean the alternator rotor to remove all traces of oil, and fit tool T3880375 to the rotor as shown below. Retain the tool to prevent the crankshaft from rotating and remove the centre bolt from the crankshaft.
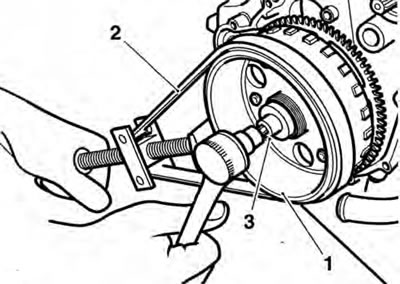
1. Rotor; 2. Tool T3880375; 3. Centre bolt
9. With the bolt removed, locate the spigot from the larger of the two thrust pads supplied with tool T3880365 to the crankshaft.

1. Thrust pad
10. Assemble tool T3880365 to the threaded centre section of the rotor.
Note: Ensure that the thrust pad does not fall out during assembly of the tool.
11. Hold the centre of the tool to prevent rotation then tighten the draw-bolt in the centre of the tool to release the taper seating of the rotor from the crankshaft.
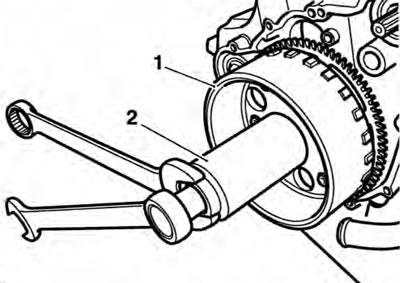
1. Rotor; 2. Tool T3880365
12. Withdraw the rotor and tool as an assembly and then separate the tool from the rotor. Collect the Woodruff Key and the tool thrust pad from the crankshaft.
Assembly
1. Refit the Woodruff key to the crankshaft.
2. Assemble the rotor to the keyway on the crankshaft, ensuring the Woodruff key remains in position.
Caution: Do not use tools to tighten service tool 13880375. Tighten the tool by hand only. Over-tightening of the tool will lead to damage to the alternator rotor.
3. Refit tool T3880375 to prevent the crankshaft from rotating, ensuring the rotor is free from oil and the tool is not over-tightened.
4. Tighten the rotor retaining bolt to 120 Nm.
1. Rotor; 2. Tool T3880375; 3. Centre bolt
5. Remove tool T3880375.
6. Install a new O-ring to the alternator spray bar.
7. Locate the stator to the engine cover.
8. Fit the cable retainer bracket and tighten a new retainer bolt to 6 Nm.
9. Tighten the new stator bolts to 12 Nm.
10. Position a new gasket to the crankcase dowels then refit the left hand engine cover.
11. Refit the bottom hose bracket to the front two bolts. Install the bolts, using new 35 mm bolts positioned as noted during removal (the 25 mm bolts may be re-used). Tighten the 25 mm fixings to 8 Nm, and the 35 mm fixings to 9 Nm.
1. Left hand engine cover; 2. Bottom hose bracket
12. Refit the starter motor (see page 17-18).
13. Reconnect the battery, positive (red) lead first.
14. Refit the rider's seat (see page 16-13).