
Removal
1. Remove the rider's seat (see page 16-13).
2. Disconnect the battery, negative (black) lead first.
3. Remove the fuel tank (see page 10-91).
4. Remove the airbox (see page 10-98).
5. Remove the throttle bodies (see page 10-107).
6. Disconnect the low oil pressure warning light switch.
7. Ease the boot from the starter cable terminal and then release the cable bolt.
8. Detach the cable.
9. Release the fixings securing the starter motor to the crankcase.
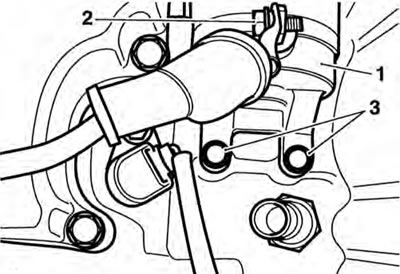
1. Starter motor; 2. Starter cable fixing; 3. Fixings
10. Ease the starter motor from the upper crankcase.
Inspection
1. Ensure the starter turns freely and without binding.
2. Check the starter O-ring for damage and deterioration. Replace as necessary.
Installation
1. Lubricate the starter motor O-ring with a small amount of petroleum jelly
2. Fit the starter motor to the upper crankcase ensuring that the O-ring does not become damaged during installation.
3. Fit and tighten the starter bolts to 10 Nm.
4. Refit the starter cable and secure with the bolt. Tighten to 3 Nm.
5. Refit the starter cable boot.
6. Connect the low oil pressure warning light switch.
7. Refit the throttle bodies (see page 10-107).
8. Refit the airbox (see page 10-101).
9. Refit the fuel tank (see page 10-92).
10. Reconnect the battery, positive (red) lead first.
11. Refit the rider's seat (see page 16-13).