
Prepare
1. Remove main fuse. See Power disconnect.
2. Remove headlamp fairing. See Headlamp fairing.
3. If removing headlamp, remove fuel tank. See Fuel tank.
Remove
Bulb
1. See Figure 8-22. Remove headlamp bulb.
- a. Remove screws (6).
- b. Pull lens assembly (5) from headlamp housing.
- c. Disconnect headlamp connector from bulb.
- d. Loosen screw (2).
- e. Remove retainer (3).
- f. Remove headlamp bulb (4).
2. Remove position bulb (7).
Headlamp
1. See Figure 8-23. Disconnect position lamp connector.
2. See Figure 8-24. Remove headlamp.
- a. Discard locknut (1).
- b. Remove washer (2) and screw (3).
- c. Remove headlamp (4).
3. Remove mounting block.
- a. Discard locknut (5).
- b. Remove mounting block (6).
Install
| FASTENER | TORQUE VALUE | |
| Headlamp vertical adjustment locknut | 20.6-25.5 Nm | 16-18 ft·lbs |
| Headlamp horizontal adjustment locknut | 34.2-41.8 Nm | 26-30 ft·lbs |
Bulb
Notice: Never touch the quartz bulb. Fingerprints will etch the glass and decrease bulb life. Handle the bulb with paper or a clean, dry cloth. Failure to do so could result in bulb damage.
1. See Figure 8-22. Install position bulb (7).
2. Install headlamp bulb.
- a. Install headlamp bulb (4).
- b. Install retainer (3).
- c. Tighten screw (2).
- d. Connect headlamp and position lamp connectors.
- e. Attach lens assembly (5) to headlamp housing.
- f. Install screws (6).
Headlamp
1. See Figure 8-24. Install mounting block.
- a. Install mounting block (6).
- b. Install new locknut (5). Tighten to 20.6-25.5 Nm (16-18 ft·lbs).
2. Install headlamp.
- a. Install headlamp (4).
- b. Install screw (3) and washer (2).
- c. Install new locknut (1). Tighten to 34.2-41.8 Nm (26-30 ft·lbs).
3. See Figure 8-23. Connect headlamp connector.
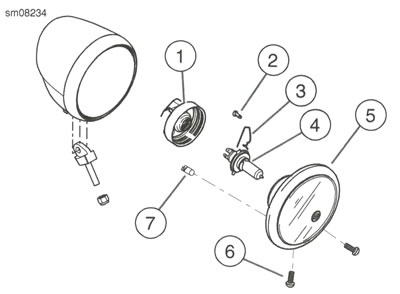
Figure 8-22. Headlamp Bulb: 1. Boot; 2. Screw; 3. Retainer; 4. Headlamp bulb; 5. Lens assembly; 6. Screw (2); 7. Position bulb

Figure 8-23. Headlamp Connector
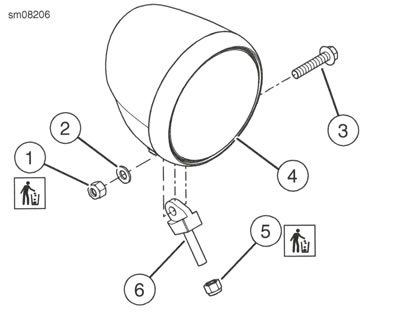
Figure 8-24. Headlamp: 1. Locknut; 2. Washer; 3. Screw; 4. Headlamp; 5. Locknut; 6. Mounting block
Align
1. Prepare motorcycle.
- a. Check tire pressure. See Inspect tires.
- b. Adjust shock preload for rider and intended load. See Shock absorbers.
- c. Fill fuel tank or add an equal amount of ballast.
2. See Figure 8-25. Check alignment.
- a. Park the motorcycle on a line (1) perpendicular to wall.
- b. Position motorcycle so that front axle is 7.6 m (25 ft) from wall.
- c. Draw a vertical line (2) on wall.
- d. Point the front wheel straight forward at wall.
- e. Measure distance (4) from floor to center of high beam bulb.
- f. With the high beam activated, verify headlamp alignment.
- g. Adjust as necessary.
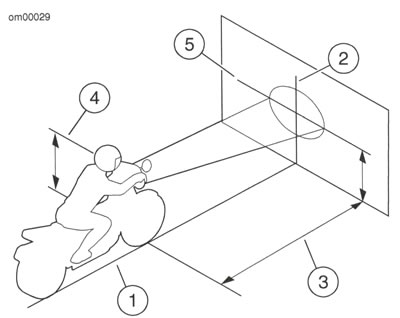
Figure 8-25. Checking Headlamp Alignment: 1. Perpendicular line; 2. Vertical line; 3. 7.6 m (25 ft); 4. High beam bulb centerline; 5. Horizontal line 53.3 mm (2.1 in) lower than bulb centerline
Adjust
| FASTENER | TORQUE VALUE | |
| Headlamp horizontal adjustment locknut | 34.2-41.8 Nm | 26-30 ft·lbs |
| Headlamp vertical adjustment locknut | 20.6-25.5 Nm | 16-18 ft·lbs |
1. See Figure 8-26. Set horizontal adjustment.
- a. Loosen horizontal adjustment locknut (3).
- b. Direct light beam straight ahead.
- c. Tighten horizontal adjustment locknut to 34.2-41.8 Nm (26-30 ft·lbs).
2. Set vertical adjustment.
- a. Loosen locknut (1) for vertical adjustment bolt (2).
- b. Aim headlamp at horizontal line on wall.
- c. Tighten vertical adjustment locknut to 20.6-25.5 Nm (16-18 ft·lbs).
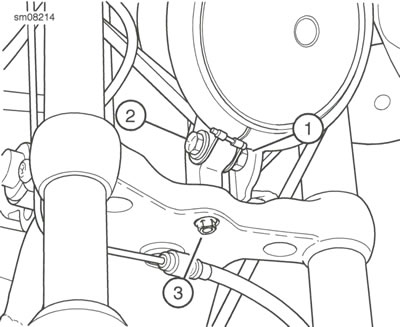
Figure 8-26. Headlamp Adjustment: 1. Vertical adjustment locknut; 2. Vertical adjustment bolt; 3. Horizontal adjustment locknut
Complete
1. Install fuel tank, if removed. See Fuel tank.
2. Install headlamp fairing. See Headlamp fairing.
3. Install main fuse. See Power disconnect.
Warning: Be sure that all lights and switches operate properly before operating motorcycle. Low visibility of rider can result in death or serious injury.
4. Test headlamp for proper operation.