
Removal
Warning: Before starting work, ensure the motorcycle is stabilised and adequately supported. This will help prevent it from falling and causing injury to the operator or damage to the motorcycle.
1. Disconnect the battery negative (black) lead first.
2. Remove the rider's seat (see page 16-13).
3. Remove the fuel tank (see page 10-91).
Note: Note the routing of the harness and its retaining clips for installation.
4. Disconnect the wheel speed sensor multiplug, Identified as the white connector, located below the ignition switch.
5. Release the wheel speed sensor harness from the brake hose clips.
6. Release the bolt and remove the sensor. Collect the shim from between the sensor and fork leg and discard the bolt.
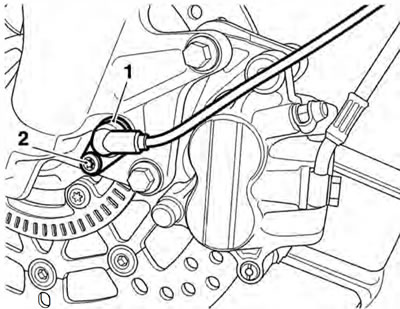
1. Front ABS wheel speed sensor; 2. Bolt
Installation
Note: Check the condition of the shim before use. Do not use a shim which is bent or damaged.
1. Position the wheel speed sensor to the fork leg with its shim between the sensor and fork leg. Temporarily fit the original bolt and tighten to 9 Nm.
2. The air gap between the wheel speed sensor and the pulser ring must be between 0.1 mm and 1.5 mm. Check and adjust the wheel speed sensor air gap as described on page 14-38.
3. Once the wheel speed sensor air gap measurement is correct, install a new bolt (if not already replaced during air gap adjustment) and tighten to 9 Nm.
4. Route the harness and secure to the brake hose clips as noted for removal.
5. Connect the wheel speed sensor multiplug.
6. Refit the fuel tank (see page 10-91).
7. Connect the battery, positive (red) lead first.
8. Refit the rider's seat (see page 16-13).
9. Check that the brakes operate correctly.