
Removal
Warning: Before starting work, ensure the motorcycle is stabilised and adequately supported. This will help prevent it from falling and causing injury to the operator or damage to the motorcycle.
1. Remove the rider's seat (see page 16-13).
2. Disconnect the battery, negative (black) lead first.
3. Remove the fuel tank (see page 10-91).
4. Remove the airbox (see page 10-98).
5. Remove the upper ABS modulator fixing.
6. Remove the four fixings and remove the front seat bridge.
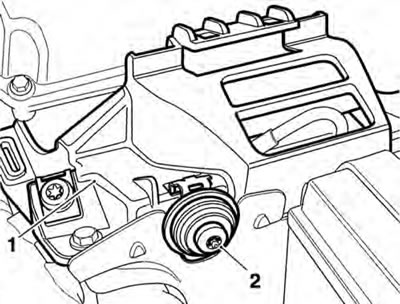
1. Front seat bridge; 2. ABS modulator upper fixing
Caution: To prevent body damage, do not spill brake fluid onto any area of the bodywork or wheels.
7. Drain the brake fluid from the front and rear master cylinders (for front brake master cylinder see page 14-12, and for rear brake master cylinder see page 14-23).
8. Remove the three fixings and detach the rear brake hose P-clips from the rear swinging arm and ABS modulator bracket (located under the rear mudguard).
1. P-clips; 2. Fixings
9. Detach the ABS wheel speed sensor cable from the rear brake hose.
10. Disconnect the ABS modulator multiplug (See page 14-53).
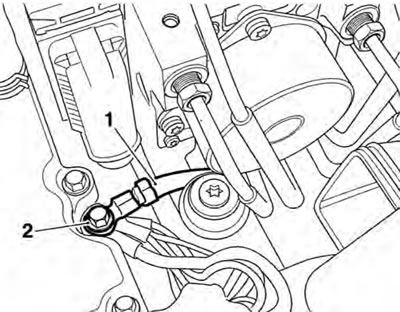
11. Remove the fixing and detach the battery negative cable form the upper crankcase.
1. Battery negative cable; 2. Fixing
12. Remove the rear brake light switch and disconnect the rear master cylinder hose at the master cylinder. Discard the sealing washers.
Warning: Before the disassembly of any brake lines in the ABS hydraulic circuit, always mark their position so that they can be returned to the same position when assembled. If the brake lines are incorrectly assembled the performance of the ABS system will be seriously compromised, leading to loss of motorcycle control and an accident.
13. Detach the three front brake hard line clips from the frame.
14. Remove the left hand lower ABS modulator fixing, located under the front seat bridge.
1. ABS modulator; 2. Left hand lower fixing
15. Remove the right hand lower ABS modulator fixing, located under the rear mudguard.
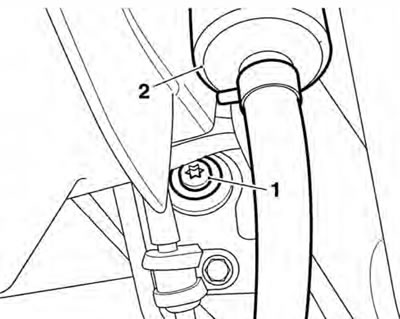
1. Right hand lower ABS modulator fixing; 2. Rear brake fluid reservoir
Warning: Do not allow the brake hard lines to become bent or kinked during ABS modulator removal. If the brake lines are bent or kinked the performance of the ABS system will be seriously compromised, leading to loss of motorcycle control and an accident.
Note: The battery negative cable is routed between the ABS modulator and the bracket, and is removed at the same time as the modulator assembly.
Caution: To prevent body damage, do not spill brake fluid onto any area of the bodywork or wheels.
16. Carefully raise the modulator, with the brake lines still attached, upwards from the motorcycle until access to the underside of the modulator can be gained. With the aid of an assistant, support the modulator in this position.
17. Detach the four brake lines from the clips on the underside of the modulator bracket.
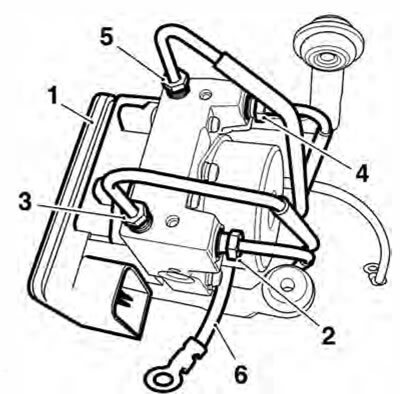
18. Noting their orientation, disconnect the four brake hard line unions and, taking care not to bend the brake lines, detach the lines from the ABS modulator.
19. Remove the ABS modulator and bracket from the motorcycle.
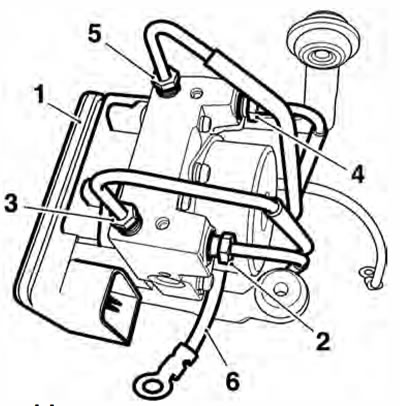
1. ABS modulator; 2. Front brake master cylinder hard line; 3. Front brake caliper hard line; 4. Rear brake master cylinder hard line; 5. Rear brake caliper hard line; 6. Battery negative lead
20. Noting its routing, remove the battery negative cable from the modulator assembly.
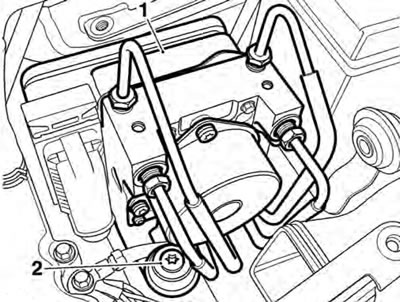
21. Remove the three screws and remove the bracket from the ABS modulator.
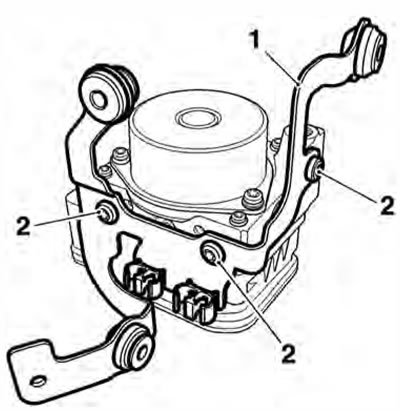
1. ABS modulator bracket; 2. Screws
Installation
1. Align the ABS modulator to its bracket, fit new screws and tighten to 9 Nm.
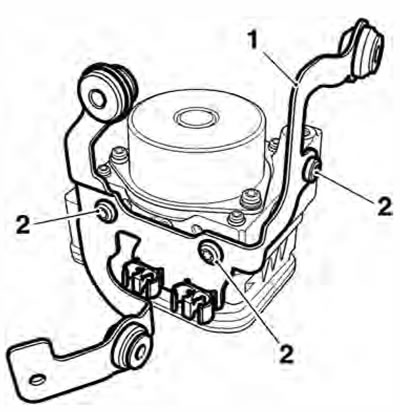
1. ABS modulator; 2. Screws
2. Re-route the battery negtive lead between the modulator and bracket as noted during removal.
3. Reposition the modulator to the two front brake lines and screw the brake line unions in to the modulator. Do not tighten the brake line unions at this stage.
4. Refit the brake lines in to the clip on the underside of the modulator.
5. Reposition the two rear brake lines to the modulator and screw the brake line unions in to the modulator. Do not tighten the brake line unions at this stage.
6. Refit the brake lines in to the clip on the underside of the modulator.
1. ABS modulator; 2. Front brake master cylinder hard line; 3. Front brake caliper hard line; 4. Rear brake master cylinder hard line; S. Rear brake caliper hard line; 6. Battery negative lead
7. Carefully manoeuvre the ABS modulator and bracket assembly to its fitted position on the frame. Ensure the brake hard lines and hoses are routed as noted during disassembly.
8. Fit the two lower ABS modulator fixings and washers. Tighten to 9 Nm.
9. Tighten the four unions to 25 Nm, taking care to ensure the brake lines do not twist during tightening.
10. Refit the battery negative lead to the upper crankcase, tightening the fixing to 9 Nm.
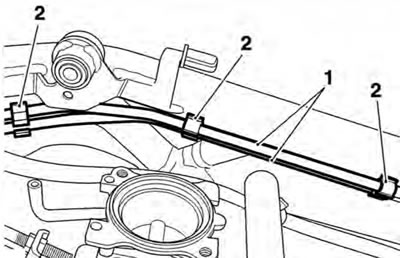
11. Refit the three front brake hard line clips to the frame.
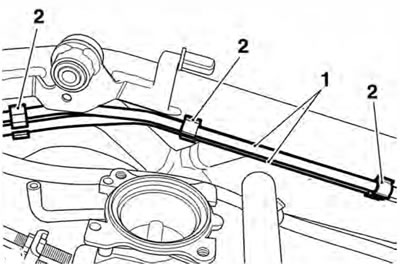
1. Front brake hard lines; 2. Clips
12. Incorporating new washers, fit the rear master cylinder hose to the master cylinder. Ensuring correct orientation of the brake hose, tighten the rear brake light switch to 15 Nm.
13. Connect the brake hose to the caliper incorporating new washers on each side of the banjo bolt.
14. Tighten the banjo bolt to 25 Nm.
15. Refit the three rear brake hose P-clips, tightening the fixings to 6 Nm.
16. Clip the rear ABS sensor cable to the rear brake hose.
1Z Reconnect the ABS modulator multiplug, and ensure the locking device is fully engaged (see page 14-53).
18. Refit the front seat bridge, tightening the fixings to 5 Nm.
19. Refit the upper ABS modulator fixing and tighten to 9 Nm.
20. Refit the airbox (see page 10-101).
21. Refit the fuel tank (see page 10-92).
22. Reconnect the battery, positive (red) lead first.
Warning: Use only DOT 4 specification brake fluid as listed in the general information section of this manual. The use of brake fluids other than those DOT 4 fluids listed in the general information section may reduce the efficiency of the braking system leading to an accident. Observe the brake fluid handling warnings given earlier in this section of the manual.
23. Bleed the front brakes (see page 14-33).
24. Bleed the rear brakes (see page 14-36).
25. Refit the rider's seat (see page 16-13).
Warning: lt is dangerous to operate the motorcycle with defective brakes; you must have your authorised Triumph Dealer take remedial action. Failure to take remedial action may reduce braking efficiency leading to loss of motorcycle control and an accident.
26. Check that the brakes operate correctly.