
Chain Free-movement Inspection
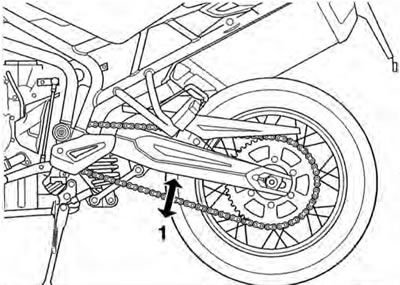
1. Maximum movement position
Warning: Before starting work, ensure the motorcycle is stabilised and adequately supported. This will help prevent it from falling and causing injury to the operator or damage to the motorcycle.
1. Place the motorcycle on a level surface and hold it in an upright position with no weight on it.
2. Rotate the rear wheel by pushing the motorcycle to find the position where the chain has least slack. Measure the chains vertical movement, mid-way between sprockets.
3. If correct, the vertical movement of the drive chain midway between the sprockets should be:
- 15 - 25 mm for the Tiger 800;
- 20 - 30 mm for Tiger 800XC.
Chain Free-movement adjustment
1. Loosen the wheel spindle nut.
2. Release the locknuts on both the left hand and right hand chain adjuster bolts.
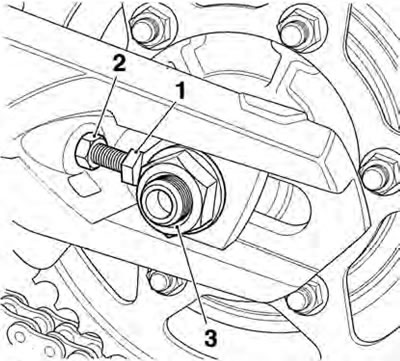
1. Adjuster bolt locknut; 2. Adjuster bolt; 3. Rear wheel spindle nut
3. Moving both adjusters by an equal amount, turn the adjuster bolts clockwise to increase chain free movement and counter clockwise to reduce chain free movement.
4. When the correct amount of chain free movement has been set, push the wheel into firm contact with the adjusters.
Note: Check for equal adiustment on both sides using the graduation marks on the swinging arm.
5. Tighten both adjuster locknuts to 15 Nm and the rear wheel spindle nut to 110 Nm.
6. Repeat the chain adjustment check. Re-adjust if necessary.
Warning: Operation of the motorcycle with insecure adjuster locknuts or a loose wheel spindle may result in impaired stability and handling of the motorcycle. This impaired stability and handling may lead to loss of motorcycle control and an accident. Check the rear brake effectiveness. Rectify if necessary.
Warning: lt is dangerous to operate the motorcycle with defective brakes; you must have your authorised Triumph dealer take remedial action before you attempt to ride the motorcycle again. Failure to take remedial action may reduce braking efficiency leading to loss of motorcycle control and an accident.
Chain Wear Inspection
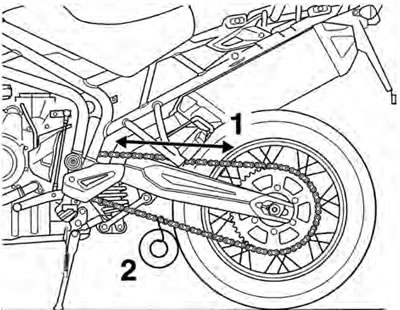
1. Measurement across 20 links; 2. 10-20kg Weight
Warning: Before starting work, ensure the motorcycle is stabilised and adequately supported. This will help prevent it from falling and causing injury to the operator or damage to the motorcycle.
1. Remove the chain guard from the swinging arm.
2. Stretch the chain taut by hanging a 10-20 kg (20-40 lb) weight on the chain.
3. Measure a length of 20 links on the straight part of the chain from pin centre of the 1 st pin to pin centre of the 21 st pin. Repeat the test at various sections of the chain to establish an average reading. This is because the chain may wear unevenly.
4. If the length exceeds the service limit of 319 mm (12.56 in), the chain must be replaced.
Warning: A chain that breaks or jumps off the sprockets could snag on the engine sprocket or lock the rear wheel, severely damaging the motorcycle and causing loss of control and an accident.
5. Examine the whole length of the chain. If there are any excessively tight or loose sections, loose pins or damaged rollers, the chain should be replaced.
6. Inspect sprockets for unevenly or excessively worn teeth. Also examine the sprockets for damaged teeth.
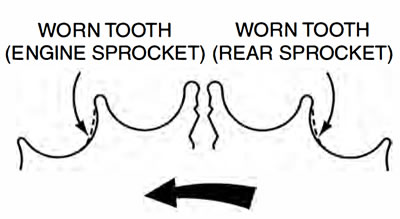
Note: Sprocket wear is exaggerated for illustration purposes.
Warning: The use of non-approved chains may result in a broken chain or may cause the chain to jump off the sprockets. Use a genuine Triumph supplied chain as specified in the Triumph Parts Catalogue. Never neglect chain maintenance and always have chains installed by an authorised Triumph dealer.
7. If there is any irregularity found in any of the components, replace the drive chain and/or any other damaged components.
8. Refit the chain guard, tightening the fixings to 9 Nm.