
Removal
Warning: If the engine has recently been running, the exhaust system will be hot. Before working on or near the exhaust system, allow sufficient time for the exhaust system to cool as touching any part of a hot exhaust system could cause burn injuries.
Warning: Before starting work, ensure the motorcycle is stabilised and adequately supported. This will help prevent it from falling and causing injury to the operator or damage to the motorcycle.
1. Raise and support the rear of the motorcycle under the frame or engine. Position a block to support the rear wheel.
2. Remove the seats (see page 16-13).
3. Disconnect the battery, negative (black) lead first.
4. Tiger 800XC models only: Remove the fuel tank infill panel (see page 16-18).
5. Loosen the two clips and detach the rear suspension unit remote reservoir from the frame.
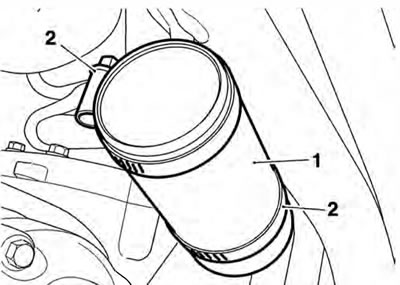
1. Remote reservoir; 2. Clips
6. All models: Remove the drag link to rear suspension unit fixing. Discard the nut.
7. Remove the drop link to swinging arm fixing. Discard the nut.
8. Reposition the drop link plates and position the drag link clear of the rear suspension unit.
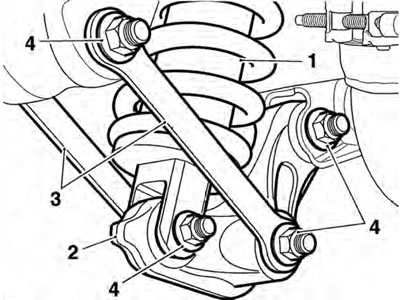
1. Rear suspension unit; 2. Drag link; 3. Drop link; 4. Fixings
Warning: Never attempt to disassemble the rear suspension unit or remote reservoir. lt contains fluid under pressure and serious injury could result if any part of the system is disturbed.
9. Remove the rear suspension unit upper mounting nut and bolt.
10. Tiger 800 models: Manoeuvre the unit downwards through the swinging arm and clear of the motorcycle.
11. Tiger 800XC models: Manoeuvre the unit downwards through the swinging arm and clear of the motorcycle, at the same time passing the remote reservoir through the frame and then through the swinging arm.
Inspection
1. Clean all components and inspect for damage/wear to:
- rear suspension unit upper and lower mountings;
- drag link, drag link bearings, sleeves and seals;
- drop link plates, drop link bearings, sleeves and seals.
2. Renew as necessary.
3. Check the swinging arm drop link bearings for wear. Overhaul as necessary.
4. Check the drag link bearings for wear. Overhaul as necessary (see page 12-13).
Warning: Never attempt to disassemble the rear suspension unit or remote reservoir. lt contains fluid under pressure and serious injury could result if any part of the system is disturbed.
5. Inspect the remote reservoir and hose (Tiger 800XC only) and the suspension unit itself for damage and fluid leaks. If there is any damage, or fluid leaks are evident, the unit must be replaced.
Installation
1. Remove the drag link sleeves and pack the bearings with fresh grease. Refit the sleeves.
2. Remove the swinging arm drop link sleeve and pack the bearings with fresh grease. Refit the sleeve.
3. Tiger 800XC models: Pass the remote reservoir upwards through the swinging arm and through the frame, as the rear suspension unit'is positioned to the motorcycle.
4. Locate the rear suspension unit and loosely fit the upper mounting bolt and a new nut.
5. Position the remote reservoir to the frame and secure with the two clips, tightening to 3 Nm. Ensure the hose is not twisted, or positioned so that it will chafe against any part of the motorcycle.
6. Refit the fuel tank infill panel (see page 16-21).
7. Tiger 800 models: Refit the rear suspension unit to the motorcycle by raising the unit upwards through the hole in the swinging arm.
8. Locate the rear suspension unit and loosely fit the upper mounting bolt and a new nut.
9. All models: Locate the drag link to the rear suspension unit and, from the left hand side, loosely fit the bolt and a new nut.
10. Reposition the drop link plates and, from the left hand side, loosely fit the bolt and a new nut.
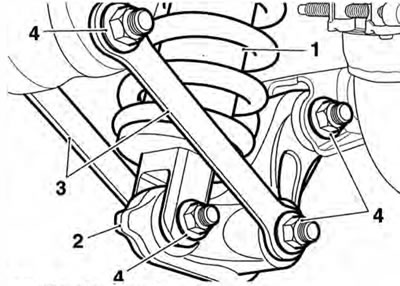
1. Rear suspension unit; 2. Drag link; 3. Drop links; 4. Fixings
11. Tighten the drop link fixing to 80 Nm.
12. Tighten the drag link to rear suspension unit fixing to 80 Nm
13. With the weight of the motorcycle on its wheels, tighten the rear suspension unit upper mounting to 48 Nm.
14. Connect the battery, red (positive) lead first.
15. Fit the seats (see page 16-13).