
Removal
Warning: If the engine has recently been running, the exhaust system will be hot. Before working on or near the exhaust system, allow sufficient time for the exhaust system to cool as touching any part of a hot exhaust system could cause burn injuries.
Warning: Before starting work, ensure the motorcycle is stabilised and adequately supported. This will help prevent it from falling and causing injury to the operator or damage to the motorcycle.
1. Remove the seats (see page 16-13).
2. Disconnect the battery, negative (black) lead first.
3. Remove the exhaust silencer (see page 10-118).
4. Remove the rear wheel (see page 15-12).
5. Support the swinging arm and remove the drop link to swinging arm nut and bolt. Discard the nut.
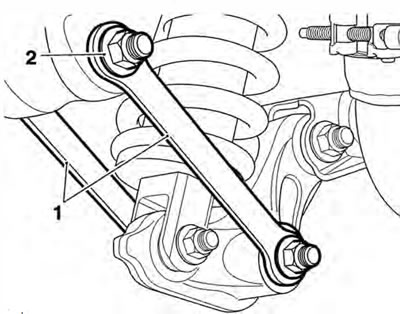
1. Drop links; 2. Fixing
6. Remove the sprocket cover.
7. Detach the chain from the output sprocket.
Warning: Do not allow the caliper to hang on the brake hose as this may damage the hose and could lead to an accident.
8. Release the brake hose clips from the swinging arm and tie the rear brake caliper to one side.
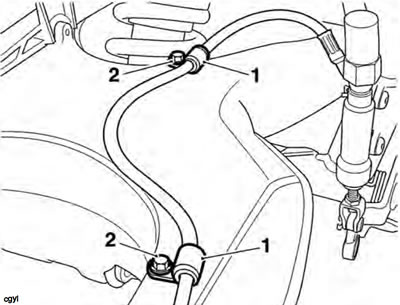
1. Rear brake hose clips; 2. Fixings
9. Remove the swinging arm spindle nut. Discard the nut.
10. Withdraw the swinging arm spindle from the right hand side and remove the swinging arm, unhooking it from the drive chain as you do so. Support the drive chain while the swinging arm is being removed to protect it from contamination.
Disassembly
1. Remove the dust covers from both sides.
2. Remove the bearing sleeves from both sides.
3. Remove the four seals.
4. Remove the bearings by drifting through from the outside.
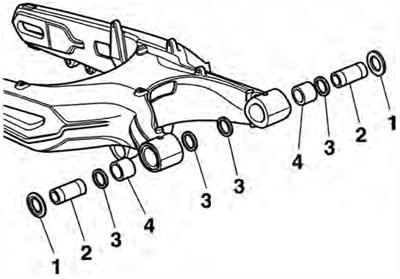
1. Dust cover; 2. Bearing sleeve; 3. Seal; 4. Needle roller bearing
5. Remove the drive chain rubbing strip.
Inspection
1. Check all swinging ann bearings for damage, pitting, and cracks. Replace as necessary.
2. Check the swinging arm for damage. Replace as necessary.
3. Check the rear wheel bearings for damage, pitting, and cracks. Replace as necessary.
4. Check all bearing seals for damage, splits etc. Replace as necessary.
5. Check the drive chain for wear, damage etc. Replace as necessary.
6. Check both sprockets for wear, damage etc. Replace as necessary.
7. Check the drive chain rubbing strip for wear and damage. Replace as necessary.
Assembly
1. Install the bearings (marked faces outwards), sleeves etc. into the swinging arm in the order shown on the previous page. Use new seals and dust covers throughout.
2. Fit the drive chain rubbing strip and tighten the fixing to 9 Nm.
3. Fit the drive chain to the output sprocket.
4. Position the swinging arm to the frame ensuring the drive chain is in position on the rubbing strip.
5. Refit the swinging arm spindle from the right hand side.
6. Fit a new swinging arm spindle nut and tighten to 110 Nm.
7. Refit the sprocket cover and tighten the bolts to 9 Nm.
8. Release the caliper and refit the rear brake hose clips to the swinging arm. Tighten the fixings to 6 Nm.
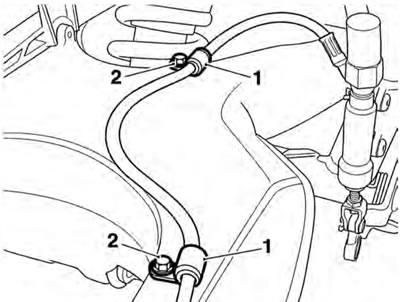
1. Rear brake hose clips; 2. Fixings
9. Refit the rear wheel (see page 15-12).
10. Refit the exhaust silencer (see page 10-95).
11. Connect the battery, red (positive) lead first.
12. Fit the seats (see page 16-13).
13. Pump the rear brake pedal several times to position the brake pads in the caliper. Rectify as necessary if correct brake operation is not restored (see page 14-23).
Warning: lt is dangerous to operate the motorcycle with defective brakes; you must have your authorised Triumph dealer take remedial action before you ride the motorcycle again. Failure to take remedial action may result in reduced braking efficiency leading to loss of motorcycle control and an accident.