MotoInstruction.ru
Mobile
version
Articles
& news
Site
map
Feed
back
Add to
bookmark
English Русский
Aprilia
BMW
Ducati
Harley
Honda
Kawasaki
Suzuki
Triumph
Yamaha
Harley:
Street▾
750/500 (2014-2021)
Sportster▾
XL/XR1200 (2012-2023)
V-Rod▾
VRSCA (2002-2006)

Removing and installing radiator (Harley Street 750)

  • Main
  • Harley
  • Street
  • 750/500
  • Engine and systems
  • Cooling system
  • Removing and installing radiat…
0

Prepare


1. Lift rear of fuel tank. See Lift rear of fuel tank.

2. Drain coolant. See Coolant of cooling system.

Remove


1. See Figure 7-14. Remove shroud.
  • a. Remove screws (8) and washers (9).
  • b. Remove shroud (7).

Note: Pry overlap ofclamps (2, 12) to remove. If clamps must be cut, use a sharp high-quality wire cutter.


2. Remove radiator.
  • a. Remove screws (6).
  • b. Remove bracket (5).
  • c. Remove upper isolators (4).
  • d. Detach upper hose (1) from radiator. Discard clamp (2).
  • e. Detach lower hose (13) from radiator. Discard clamp (12).
  • f. Remove radiator (3).

3. Remove cooling fan. See Removing and installing cooling fan.

4. If necessary, remove lower isolators (11) and bracket (10).

Install


PART NUMBERTOOL NAME
HD-41137HOSE CLAMP PLIERS

FASTENERTORQUE VALUE
Radiator screws9.0-11.0 Nm80-97 in·lbs
Radiator shroud screws9.0-11.0 Nm80-97 in·lbs

1. See Figure 7-7. Install bracket (10) and lower isolators (11) on frame.

2. Install cooling fan. See Removing and installing cooling fan.

Note: Use HOSE CLAMP PLIERS (Part # HD-41137) to secure clamps (2, 12).


3. Install radiator.
  • a. Attach lower hose (13) to radiator. Install new clamp (12).
  • b. Attach upper hose (1) to radiator. Install new clamp (2).
  • c. Install upper isolators (4).
  • d. Install lower end of radiator (3) on lower isolators (11).
  • e. Install bracket (5).
  • f. Install screws (6). Tighten to 9.0-11.0 Nm (80-97 in·lbs).

4. Install shroud.
  • a. Install shroud (7).
  • b. Install washers (9) and screws (8). Tighten to 9.0-11.0 Nm (80-97 in·lbs).


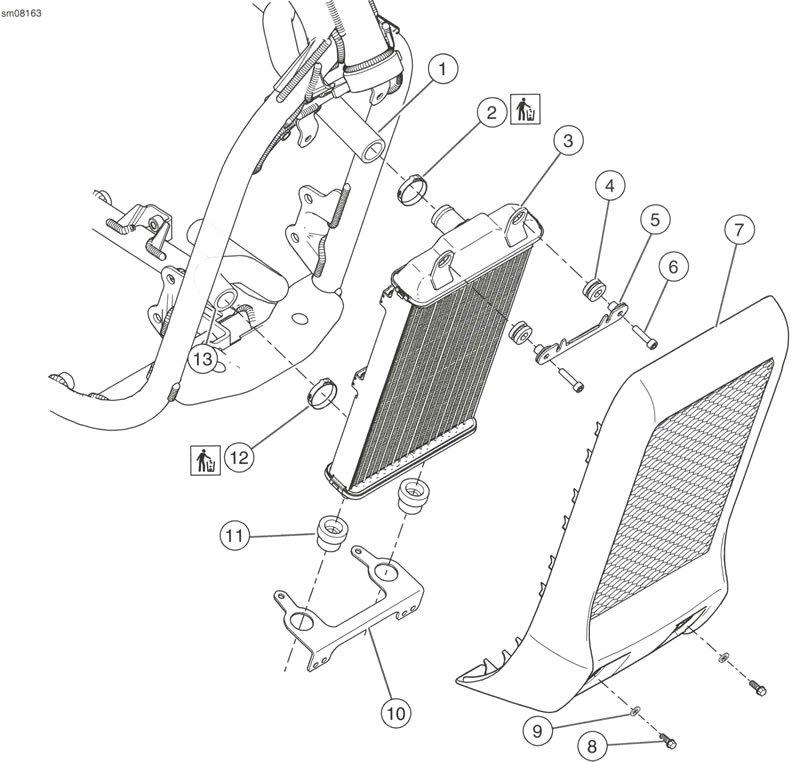
Figure 7-14. Radiator: 1. Upper hose; 2. Clamp; 3. Radiator; 4. Upper isolator (2); 5. Bracket; 6. Screw (2); 7. Shroud; 8. Screw (2); 9. Washer (2); 10. Bracket; 11. Lower isolator (2); 12. Clamp; 13. Lower hose


Complete


1. Fill system with coolant. See Coolant of cooling system.

2. Secure rear of fuel tank. See Lift rear of fuel tank.
See this article in russian language
◀ Previous
Harley 750/500 : Cooling system
 

Engine coolant temperature (ECT) sensor
Coolant hoses
Coolant overflow tank
Coolant pump
Thermostat housing
Coolant of cooling system
 
Similar articles about motorcycles of other brands
Kawasaki Versys 650 (2007-2025): Removing and installing radiator БМВ F 650 GS (2000-2007): Removing and installing radiator Yamaha FZ1 Fazer (2006-2015): Installing the radiator Honda CB 400 SF (1992-1999): Front Brake Disc — Checking, Removing and Installing Aprilia SL 750 Shiver (2007-2016): Removing the radiator Ducati ST2 (1997-2003): Removing the instrument panel side covers Suzuki DRZ 250 (1996-2007): Removal engine components without removing the engine from the motorcycle Triumph Rocket III (2004-2018): Exploded view — radiator
Link to this article in different formats
TEXTHTMLBB Code
Comments and feedback from visitors
No comments yet, you will be the first!


Add up two numbers: 37 + 30


750/500 (2014-2021) 
  • Information for owner
  • Introduction to manual
  • Maintenance
  • Engine and systems
  • Engine repair
  • Fuel system
  • Cooling system
  • Exhaust system
  • Transmission
  • Running gear and frame
  • Frame and hinged elements
  • Suspension and handlebar
  • Brake system
  • Wheels and tires
  • Electric equipment
  • Equipment and devices
  • Starting and charging system
  • Lighting and lamps
Aprilia BMW Ducati Harley Honda Kawasaki Suzuki Triumph Yamaha
MotoInstruction.ru © 2021–2025 | Sitemap | Articles | Contacts | Site search | Add to bookmarks | Mobile version