Prepare
1. Remove main fuse. See Power disconnect.
2. Remove seat. See Removing and installing seat.
3. Remove fuel tank. See Fuel tank.
4. Detach fuel line from fuel pump. See Fuel line.
Remove
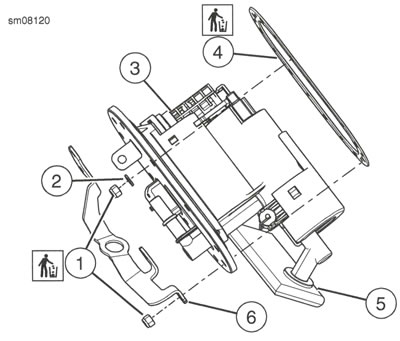
1. See Figure 6-10. Remove fuel pump assembly.
- a. Remove nuts (1) and washers (2). Discard nuts.
- b. Remove bracket (6).
- c. Remove fuel pump assembly (3).
2. Discard seal (4).
Warning: Do not use solvents or other products that contain chlorine on plastic fuel system components. Chlorine can degrade plastic fuel system components, which can cause a loss of fuel system pressure or engine stalling and could result in death or serious injury.
Install
| FASTENER | TORQUE VALUE | |
| Fuel pump assembly nuts | 4.2-4 5 Nm | 38-39 in·lbs |
1 See Figure 6-10. Install new seal (4).
2. Install fuel pump assembly.
- a. Install fuel pump assembly (3).
- b. Install bracket (6).
Note: Do not use washers (2) when securing bracket (6) with nuts (1).
- c. Install washers (2) and new nuts (1). Tighten finger-tight.
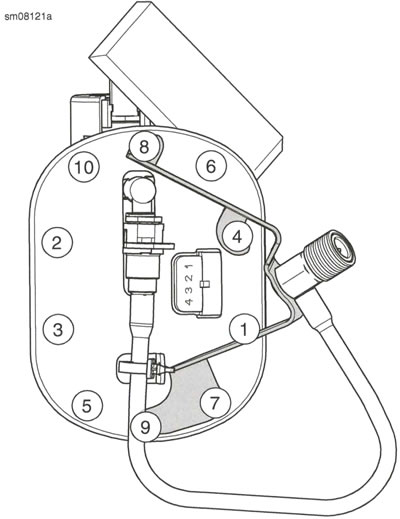
3. See Figure 6-11. Tighten in order shown to 4.2-4.5 Nm (38-39 in·lbs).

Figure 6-10. Fuel Pump Assembly: 1. Nut (10); 2. Washer (7); 3. Fuel pump assembly; 4. Seal; 5. Inlet filter; 6. Bracket

Figure 6-11. Tightening Sequence
Complete
1. Attach fuel line to fuel pump. See Fuel line.
2. Install fuel tank. See Fuel tank.
3. Install seat. See Removing and installing seat.
4. Install main fuse. See Power disconnect.
