MotoInstruction.ru
Mobile
version
Articles
& news
Site
map
Feed
back
Add to
bookmark
English Русский
Aprilia
BMW
Ducati
Harley
Honda
Kawasaki
Suzuki
Triumph
Yamaha
Harley:
Street▾
750/500 (2014-2021)
Sportster▾
XL/XR1200 (2012-2023)
V-Rod▾
VRSCA (2002-2006)

Oil pressure (Harley Street 750)

  • Main
  • Harley
  • Street
  • 750/500
  • Engine and systems
  • Engine repair
  • Oil pressure
0

Operation


See Figure 4-3. The red OIL PRESSURE indicator lamp illuminates to indicate improper circulation of the engine oil. The indicator illuminates when the ignition is turned on (before the engine is started), but normally extinguishes once the engine is running.

Notice: If the oil pressure indicator lamp remains lit, always check the oil supply first. If the oil supply is normal and the lamp is still lit, stop the engine at once and do not ride further until the trouble is located and the necessary repairs are made. Failure to do so may result in engine damage.


If the lamp remains illuminated, check the following:
  • Low oil level
  • Diluted oil supply or incorrect oil viscosity
  • Faulty lamp wiring
  • Faulty oil pressure switch
  • Damaged oil pump
  • Plugged oil filter element
  • Inoperative or weak spring in the oil pressure relief valve
  • Damaged or incorrectly installed O-rings in the engine

To troubleshoot the issue, always check the engine oil level first. If the oil level is within proper range, check oil pressure. See Troubleshooting of engine for oil pressure test.


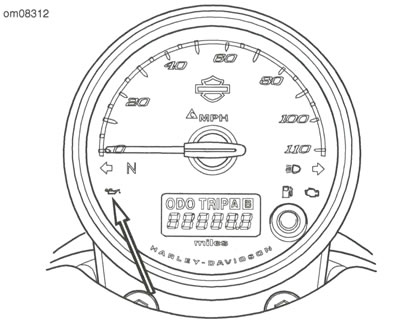
Figure 4-3. Oil Pressure Indicator Lamp


Oil pressure check


PART NUMBERTOOL NAME
HD-45308OIL PRESSURE GAUGE

FASTENERTORQUE VALUE
Oil pressure test port plug10.0-12.0 Nm89-106 in·lbs


1. Fill crankcase to proper level.

2. Figure 4-4. Remove plug.

3. Attach OIL PRESSURE GAUGE (Part # HD-45308) with appropriate adapter to oil pressure test port.

Note: After an engine rebuild, remove fuel pump fuse to verify that oil pressure is present before engine starts.


4. Test oil pressure.
  • a. Run motorcycle until engine is at normal operating temperature.
  • b. Record oil pressure on gauge.
  • c. Stop engine.
  • d. Compare oil pressure reading with specification. See Specifications of engine.

5. Remove test equipment.

6. Install plug. Tighten to 10.0-12.0 Nm (89-106 in·lbs).


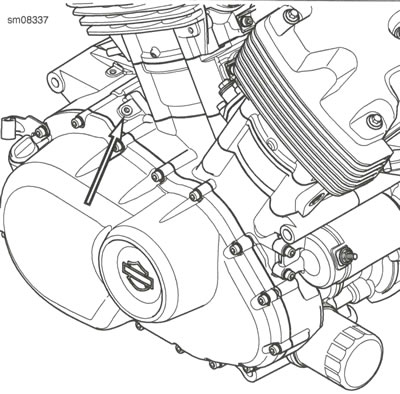
Figure 4-4. Oil Pressure Test Port
See this article in russian language
◀ Previous
Harley 750/500 : Engine repair
Next ▶

Breather operation
Engine oil flow
Specifications of engine
Fastener torque values
Troubleshooting of engine
Front engine mount
Rear engine mount
Replace engine
Rebuild engine
Intake adapter
Similar articles about motorcycles of other brands
Suzuki DRZ 250 (1996-2007): Tire pressure Triumph Rocket III (2004-2018): Low oil pressure warning light switch — removal and installation Yamaha FZ1 Fazer (2006-2015): Measuring the compression pressure Kawasaki ZX6R/ZX600J (2000-2002): Cooling system — pressure testing Honda CB 400 SF (1992-1999): Oil pressure sensor — removal and installation BMW R 1150 GS (1999-2004): Removing and installing fuel distributor and pressure regulator Ducati ST2 (1997-2003): Checking the engine oil pressure Aprilia SL 750 Shiver (2007-2016): Intake air pressure sensor
Link to this article in different formats
TEXTHTMLBB Code
Comments and feedback from visitors
No comments yet, you will be the first!


Add up two numbers: 12 + 44


750/500 (2014-2021) 
  • Information for owner
  • Introduction to manual
  • Maintenance
  • Engine and systems
  • Engine repair
  • Fuel system
  • Cooling system
  • Exhaust system
  • Transmission
  • Running gear and frame
  • Frame and hinged elements
  • Suspension and handlebar
  • Brake system
  • Wheels and tires
  • Electric equipment
  • Equipment and devices
  • Starting and charging system
  • Lighting and lamps
Aprilia BMW Ducati Harley Honda Kawasaki Suzuki Triumph Yamaha
MotoInstruction.ru © 2021–2025 | Sitemap | Articles | Contacts | Site search | Add to bookmarks | Mobile version